Dell PowerEdge M1000e Information Update - Page 12
See Updating the CMC Firmware Using the Web-based Interface
 |
View all Dell PowerEdge M1000e manuals
Add to My Manuals
Save this manual to your list of manuals |
Page 12 highlights
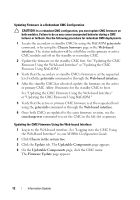
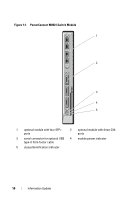
Updating Firmware in a Redundant CMC Configuration CAUTION: In a redundant CMC configuration, you must update CMC firmware on both modules. Failure to do so may cause unexpected behavior during a CMC failover or failback. Use the following procedure for redundant CMC deployments. 1 Locate the secondary or standby CMC by using the RACADM getsysinfo command, or by using the Chassis Summary page in the Web-based interface. The status indicator will be solid blue on the primary or active CMC module and off on the standby or secondary CMC. 2 Update the firmware on the standby CMC first. See "Updating the CMC Firmware Using the Web-based Interface" or "Updating the CMC Firmware Using RACADM." 3 Verify that the secondary or standby CMC's firmware is at the requested level with the getsysinfo command or through the Web-based interface. 4 After the standby CMC has rebooted, update the firmware on the active or primary CMC. Allow 10 minutes for the standby CMC to boot. See "Updating the CMC Firmware Using the Web-based Interface" or "Updating the CMC Firmware Using RACADM." 5 Verify that the active or primary CMC firmware is at the requested level using the getsysinfo command or through the Web-based interface. 6 Once both CMCs are updated to the same firmware revision, use the cmcchangeover command to reset the CMC in the left slot as primary. Updating the CMC Firmware Using the Web-based Interface 1 Log in to the Web-based interface. See "Logging in to the CMC Using the Web-Based Interface" in your M1000e Configuration Guide. 2 Click Chassis in the system tree. 3 Click the Update tab. The Updatable Components page appears. 4 On the Updatable Components page, click the CMC name. The Firmware Update page appears. 12 Information Update
-
 1
1 -
2
-
3
-
4
-
5
-
6
-
 7
7 -
 8
8 -
 9
9 -
 10
10 -
 11
11 -
 12
12 -
 13
13 -
 14
14 -
 15
15 -
 16
16 -
 17
17 -
18
-
19
-
20
-
21
-
22
-
23
-
24
-
25
-
26
-
27
-
28
-
29
-
30
-
31
-
32
-
33
-
34
-
35
-
36
-
37
-
38
-
39
-
40
-
41
-
42
-
43
-
44
-
45
-
46
-
47
-
48
-
49
-
50
-
51
-
52
-
53
-
54
-
55
-
56
-
57
-
58
-
59
-
60
-
61
-
62
-
63
-
64
-
65
-
66
-
67
-
68
-
69
-
70
-
71
-
72
-
73
-
74
-
75
-
76
-
77
-
78
-
79
-
80
-
81
-
82
-
83
-
84
-
85
-
86
-
87
-
88
-
89
-
90
-
91
-
92
-
93
-
94
-
95
-
96
-
97
-
98
-
99
-
100
-
101
-
102
-
103
-
104
-
105
-
106
-
107
-
108
-
109
-
110
-
111
-
112
-
113
-
114
-
115
-
116
-
117
-
118
-
119
-
120
-
121
-
122
-
123
-
124
-
125
-
126
-
127
-
128
-
129
-
130
-
131
-
132
-
133
-
134
-
135
-
136
-
137
-
138
-
139
-
140
-
141
-
142
-
143
-
144
-
145
-
146
-
147
-
148
-
149
-
150
-
151
-
152
-
153
-
154
-
155
-
156
-
157
-
158
-
159
-
160
-
161
-
162
-
163
-
164
-
165
-
166
-
167
-
168
-
169
-
170
-
171
-
172
-
173
-
174
-
175
-
176
-
177
-
178
-
179
-
180
-
181
-
182
-
183
-
184
-
185
-
186
 |
 |