Dell PowerEdge M520 Rack Installation Guide - Page 18
Installing the VersaRails Assemblies
 |
View all Dell PowerEdge M520 manuals
Add to My Manuals
Save this manual to your list of manuals |
Page 18 highlights
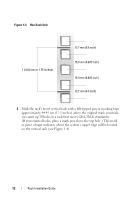
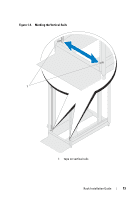
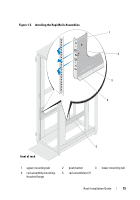
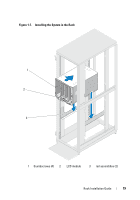
Installing the VersaRails Assemblies 1 At the front of the rack cabinet, place a VersaRails assembly so that its mounting-bracket flange fits between the marks or tape (or numbered location) on the rack (see Figure 1-6). The holes on the front of the mounting bracket should align with the holes between the marks on the front vertical rail. NOTE: The VersaRails occupy only the lower 6-U of the 10-U space that is required for this system. 2 Locate the round mounting hole indicated by the tooled arrow cutout on the VersaRails (see Figure 1-6). 3 Install two 10-32 x 0.5-inch flange-head Phillips screws in the front mounting flange to secure the rail assembly to the front vertical rail. See Figure 1-6. • The upper mounting screw should be installed in the middle round hole of the 6th-U space counting up from the bottom of the 10-U space. • The lower mounting screw should be installed in the middle round hole of the 1st-U space counting up from the bottom. NOTE: The two midsection round holes on the VersaRails are for securing your system to the rack. To assemble the VersaRails, use only the round holes indicated by the two tooled arrow cutouts (see Figure 1-6). 4 At the back of the cabinet, pull back on the mounting-bracket flange until the mounting holes align with their respective holes on the back vertical rail. 5 Install two 10-32 x 0.5-inch flange-head Phillips screws in the back mounting flange to secure the rail assembly to the back vertical rail. 6 Repeat step 1 through step 5 for the rail assembly on the other side of the rack. NOTE: Ensure that the rails are mounted at the same vertical position on both sides of the rack. 16 Rack Installation Guide
-
 1
1 -
2
-
3
-
4
-
5
-
6
-
7
-
8
-
9
-
10
-
11
-
12
-
 13
13 -
 14
14 -
 15
15 -
 16
16 -
 17
17 -
 18
18 -
 19
19 -
 20
20 -
 21
21 -
 22
22 -
 23
23 -
24
-
25
-
26
-
27
-
28
-
29
-
30
-
31
-
32
-
33
-
34
-
35
-
36
-
37
-
38
-
39
-
40
-
41
-
42
-
43
-
44
-
45
-
46
-
47
-
48
-
49
-
50
-
51
-
52
-
53
-
54
-
55
-
56
-
57
-
58
-
59
-
60
-
61
-
62
-
63
-
64
-
65
-
66
-
67
-
68
-
69
-
70
-
71
-
72
-
73
-
74
-
75
-
76
-
77
-
78
-
79
-
80
-
81
-
82
-
83
-
84
-
85
-
86
-
87
-
88
-
89
-
90
-
91
-
92
-
93
-
94
-
95
-
96
-
97
-
98
-
99
-
100
-
101
-
102
-
103
-
104
-
105
-
106
-
107
-
108
-
109
-
110
-
111
-
112
-
113
-
114
-
115
-
116
-
117
-
118
-
119
-
120
-
121
-
122
-
123
-
124
-
125
-
126
-
127
-
128
-
129
-
130
-
131
-
132
-
133
-
134
-
135
-
136
-
137
-
138
-
139
-
140
-
141
-
142
-
143
-
144
 |
 |