Dell PowerEdge SC430 Installation Guide - Page 24
Closing the System, Inside the System - parts
 |
View all Dell PowerEdge SC430 manuals
Add to My Manuals
Save this manual to your list of manuals |
Page 24 highlights
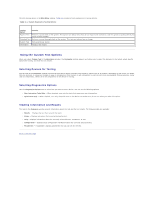
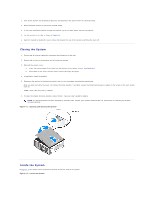
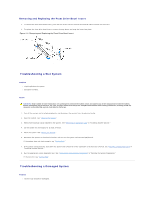
1. Turn off the system and attached peripherals, and disconnect the system from the electrical outlet. 2. Press the power button to ground the system board. 3. If you have installed a padlock through the padlock ring on the back panel, remove the padlock. 4. Lay the system on its side as shown in Figure 4-1. 5. Open the system by sliding the cover release tab toward the rear of the system and lifting the cover off. Closing the System 1. Ensure that all internal cables are connected and folded out of the way. 2. Ensure that no tools or extra parts are left inside the system. 3. Reinstall the system cover: a. Insert the bottom edge of the cover into the bottom of the system chassis. See Figure 4-1. b. Press down on the cover until the cover release tab snaps into place. 4. If applicable, install the padlock. 5. Reconnect the system to the electrical outlet, and turn on the system and attached peripherals. After you open and close the cover, the chassis intrusion detector, if enabled, causes the following message to appear on the screen at the next system start-up: ALERT! Cover was previously removed. 6. To reset the chassis intrusion detector, press . See your User's Guide for details. NOTE: If a setup password has been assigned by someone else, contact your network administrator for information on resetting the chassis intrusion detector. Figure 4-1. Opening and Closing the System Inside the System In Figure 4-2, the system cover is opened to provide an interior view of the system. Figure 4-2. Inside the System
-
 1
1 -
2
-
3
-
4
-
5
-
6
-
7
-
8
-
9
-
10
-
11
-
12
-
13
-
14
-
15
-
16
-
17
-
18
-
 19
19 -
 20
20 -
 21
21 -
 22
22 -
 23
23 -
 24
24 -
 25
25 -
 26
26 -
 27
27 -
 28
28 -
 29
29 -
30
-
31
-
32
-
33
-
34
-
35
-
36
-
37
-
38
-
39
-
40
-
41
-
42
-
43
-
44
-
45
-
46
-
47
-
48
-
49
-
50
-
51
-
52
-
53
-
54
-
55
-
56
-
57
-
58
-
59
-
60
-
61
-
62
-
63
-
64
-
65
-
66
-
67
-
68
-
69
 |
 |