Dell PowerEdge SC430 Installation Guide - Page 42
Power Supply
 |
View all Dell PowerEdge SC430 manuals
Add to My Manuals
Save this manual to your list of manuals |
Page 42 highlights
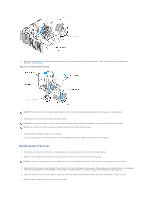
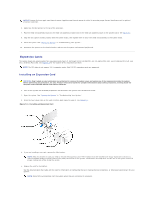
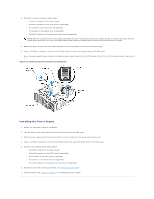
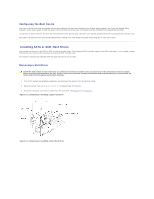
6. Place the card-edge connector in the expansion-card connector and press down firmly. Ensure that the card is fully seated in the slot and all cards and filler brackets are flush with the alignment bar. 7. Close the card retention door to secure the card(s) in the system. NOTICE: Do not route card cables over or behind the cards. Cables routed over the cards can prevent the system cover from closing properly or cause damage to the equipment. 8. Connect any cables that should be attached to the card. See the documentation for the card for information about the card's cable connections. 9. Close the system. See "Closing the System" in "Troubleshooting Your System." 10. Reconnect the system to the electrical outlet, and turn on the system and attached peripherals. 11. Install any device drivers required for the card as described in the documentation for the card. Removing an Expansion Card CAUTION: Only trained service technicians are authorized to remove the system cover and access any of the components inside the system. Before performing any procedure, see your Product Information Guide for complete information about safety precautions, working inside the computer and protecting against electrostatic discharge. 1. Turn off the system and attached peripherals, and disconnect the system from the electrical outlet. 2. Open the system. See "Opening the System" in "Troubleshooting Your System." 3. Press the two release tabs on the card retention door inward to open it. See Figure 5-4. 4. If necessary, disconnect any cables from the card. 5. Grasp the card by its top corners and ease it out of its connector. 6. If you are removing the card permanently, install a filler bracket in the empty card-slot opening. NOTE: Filler brackets must be installed over empty expansion card slots to maintain FCC certification of the system. The brackets also keep dust and dirt out of the system and aid in proper cooling and airflow inside the system. 7. Close the card retention door to secure the remaining card(s) in the system. See Figure 5-4. 8. Close the system. See "Closing the System" in "Troubleshooting Your System." 9. Reconnect the system to the electrical outlet, and turn on the system and attached peripherals. 10. Remove the card's device driver from the operating system. Power Supply Removing the Power Supply CAUTION: Only trained service technicians are authorized to remove the system cover and access any of the components inside the system. Before performing any procedure, see your Product Information Guide for complete information about safety precautions, working inside the computer and protecting against electrostatic discharge. 1. Turn off the system and attached peripherals, and disconnect the system from the electrical outlet. 2. Open the system. See "Opening the System." 3. Remove the heat sink and shroud assembly. See "Removing the Processor."
-
 1
1 -
2
-
3
-
4
-
5
-
6
-
7
-
8
-
9
-
10
-
11
-
12
-
13
-
14
-
15
-
16
-
17
-
18
-
19
-
20
-
21
-
22
-
23
-
24
-
25
-
26
-
27
-
28
-
29
-
30
-
31
-
32
-
33
-
34
-
35
-
36
-
 37
37 -
 38
38 -
 39
39 -
 40
40 -
 41
41 -
 42
42 -
 43
43 -
 44
44 -
 45
45 -
 46
46 -
 47
47 -
48
-
49
-
50
-
51
-
52
-
53
-
54
-
55
-
56
-
57
-
58
-
59
-
60
-
61
-
62
-
63
-
64
-
65
-
66
-
67
-
68
-
69
 |
 |