Dell PowerEdge T420 Owner's Manual - Page 102
Removing and Installing a Non-Redundant AC Power Supply, unit cage.
 |
View all Dell PowerEdge T420 manuals
Add to My Manuals
Save this manual to your list of manuals |
Page 102 highlights
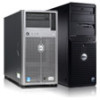
NOTE: For systems installed with the wheel assembly, ensure that you lay the system on a sturdy, stable surface with the wheel assembly extending off the edge of the surface. 3. Disconnect the power cable from the power source. 4. Disconnect the power cable from the power supply and remove the power cables from the cable strap. 5. Open the system. 6. Disconnect all the power cables from the power supply to the system board, hard-drive backplane, hard drives, and optical drives, as applicable. 7. Remove the screw securing the power supply to the chassis and slide the power supply out of the power supply unit cage. Figure 53. Removing and Installing a Non-Redundant AC Power Supply 1. screw 2. power supply unit cage 3. non-redundant power supply 4. standoff on the chassis 102
-
 1
1 -
2
-
3
-
4
-
5
-
6
-
7
-
8
-
9
-
10
-
11
-
12
-
13
-
14
-
15
-
16
-
17
-
18
-
19
-
20
-
21
-
22
-
23
-
24
-
25
-
26
-
27
-
28
-
29
-
30
-
31
-
32
-
33
-
34
-
35
-
36
-
37
-
38
-
39
-
40
-
41
-
42
-
43
-
44
-
45
-
46
-
47
-
48
-
49
-
50
-
51
-
52
-
53
-
54
-
55
-
56
-
57
-
58
-
59
-
60
-
61
-
62
-
63
-
64
-
65
-
66
-
67
-
68
-
69
-
70
-
71
-
72
-
73
-
74
-
75
-
76
-
77
-
78
-
79
-
80
-
81
-
82
-
83
-
84
-
85
-
86
-
87
-
88
-
89
-
90
-
91
-
92
-
93
-
94
-
95
-
96
-
 97
97 -
 98
98 -
 99
99 -
 100
100 -
 101
101 -
 102
102 -
 103
103 -
 104
104 -
 105
105 -
 106
106 -
 107
107 -
108
-
109
-
110
-
111
-
112
-
113
-
114
-
115
-
116
-
117
-
118
-
119
-
120
-
121
-
122
-
123
-
124
-
125
-
126
-
127
-
128
-
129
-
130
-
131
-
132
-
133
-
134
-
135
-
136
-
137
-
138
-
139
-
140
-
141
-
142
-
143
-
144
-
145
-
146
-
147
-
148
-
149
-
150
-
151
-
152
-
153
-
154
-
155
-
156
-
157
-
158
-
159
-
160
-
161
 |
 |
