Dell PowerEdge XL 5133-4 Dell PowerEdge M I/O Aggregator Getting Started Guide - Page 20
Connecting a Console Terminal
 |
View all Dell PowerEdge XL 5133-4 manuals
Add to My Manuals
Save this manual to your list of manuals |
Page 20 highlights
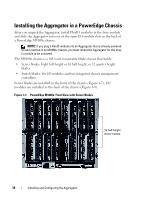
Connecting a Console Terminal After the I/O Aggregator powers on, complete all external cabling connections and connect a terminal to the blade to configure the switch. To monitor and configure the Aggregator using the serial console, use the USB console port on the front panel of the switch ( Figure 1-3) to connect it to a VT100 terminal or to a computer running VT100 terminal emulation software. The console port is implemented as a data terminal equipment (DTE) connector. The following equipment is required to use the console port: • VT100-compatible terminal or a desktop or a portable computer with a serial port running VT100 terminal emulation software, such as Microsoft HyperTerminal. • A serial cable (provided) with a USB type-A connector for the console port and DB-9 connector for the terminal. Perform the following tasks to connect a terminal to the switch console port: 1 Connect the DB-9 connector on the serial cable to the terminal or computer running VT100 terminal emulation software. 2 Configure the terminal emulation software as follows: a Select the appropriate serial port (for example, COM 1) to connect to the console. b Set the data rate to 9600 baud. c Set the data format to 8 data bits, 1 stop bit, and no parity. d Set the flow control to none. e Set the terminal emulation mode to VT100. f Select Terminal keys for Function, Arrow, and Ctrl keys. Ensure that the setting is for Terminal keys (not Microsoft Windows keys). Connect the USB connector on the cable directly to the switch console port. The console port on the Aggregator is located below the fixed 40GbE ports (Figure 1-3). 20 Installing and Configuring the Aggregator
-
 1
1 -
2
-
3
-
4
-
5
-
6
-
7
-
8
-
9
-
10
-
11
-
12
-
13
-
14
-
 15
15 -
 16
16 -
 17
17 -
 18
18 -
 19
19 -
 20
20 -
 21
21 -
 22
22 -
 23
23 -
 24
24 -
 25
25 -
26
-
27
-
28
-
29
-
30
-
31
-
32
-
33
-
34
-
35
-
36
-
37
-
38
 |
 |
