Dell S1909WFP User's Guide - Page 14
Using the On-Screen display OSD Menu
 |
View all Dell S1909WFP manuals
Add to My Manuals
Save this manual to your list of manuals |
Page 14 highlights
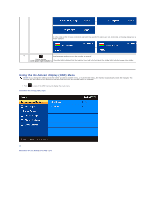
or If either VGA or DVI-D input is selected and both VGA and DVI-D cables are not connected, a floating dialog box as shown below appears. or 5 Use the power button to turn the monitor on and off. Power button (with power light indicator) The white light indicates that the monitor is on and fully functional. An amber light indicates power save mode. Using the On-Screen display (OSD) Menu NOTE: If you change the settings and then either proceed to another menu, or exit the OSD menu, the monitor automatically saves the changes. The changes are also saved if you change the settings and then wait for the OSD menu to disappear. 1. Push to launch the OSD menu and display the main menu. Main Menu for Analog (VGA) Input Or Main Menu for non Analog (non VGA) Input
-
 1
1 -
2
-
3
-
4
-
5
-
6
-
7
-
8
-
 9
9 -
 10
10 -
 11
11 -
 12
12 -
 13
13 -
 14
14 -
 15
15 -
 16
16 -
 17
17 -
 18
18 -
 19
19 -
20
-
21
-
22
-
23
-
24
-
25
-
26
-
27
-
28
-
29
-
30
-
31
 |
 |
