Dell S3048-ON EMC PowerSwitch Installation Guide March 2022 - Page 17
Two-post center-mount installation, Four-post threaded installation
 |
View all Dell S3048-ON manuals
Add to My Manuals
Save this manual to your list of manuals |
Page 17 highlights
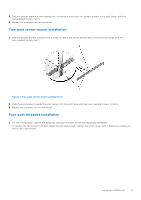
3. Slide the plunger bracket forward against the vertical post and secure the plunger bracket to the post flange with two user-supplied screws. item 3. 4. Repeat this procedure for the second rail. Two-post center-mount installation 1. Slide the plunger bracket rearward until it clicks into place and secure the bracket to the front post flange with two user-supplied screws, item 1. Figure 7. Two-post center-mount configuration 2. Slide the back bracket towards the post. Secure it to the post flange with two user-supplied screws, to item 2. 3. Repeat this procedure for the second rail. Four-post threaded installation 1. For this configuration, remove the flange ear castings from each end of the ReadyRails assemblies. To remove the two screws from each flange ear and remove each casting, use a Torx driver, item 1. Retain the castings for future rack requirements. Install the S3048-ON 17
-
 1
1 -
2
-
3
-
4
-
5
-
6
-
7
-
8
-
9
-
10
-
11
-
 12
12 -
 13
13 -
 14
14 -
 15
15 -
 16
16 -
 17
17 -
 18
18 -
 19
19 -
 20
20 -
 21
21 -
 22
22 -
23
-
24
-
25
-
26
-
27
-
28
-
29
-
30
-
31
-
32
-
33
-
34
-
35
-
36
-
37
 |
 |
