Dell S3048-ON EMC PowerSwitch Installation Guide March 2022 - Page 20
Ground cable, Optics installation, Optics removal, Switch power-up
 |
View all Dell S3048-ON manuals
Add to My Manuals
Save this manual to your list of manuals |
Page 20 highlights
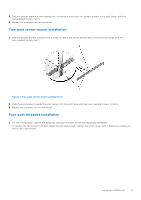
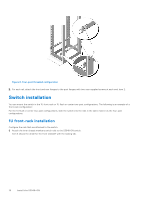
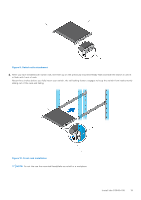
Ground cable Dell EMC recommends you ground your switch. To attach the ground cable to the chassis, use a single M4x0.7 screw. The cable itself is not included with the S3048-ON switch. To properly ground the chassis, Dell EMC recommends using a 6 AWG one-hole lug, #10 hole size, 63" spacing, not included in shipping. The one-hole lug must be a UL recognized, crimp-type lug. CAUTION: Grounding conductors must be made of copper. Do not use aluminum conductors. NOTE: The rack installation ears are not suitable for grounding. NOTE: Coat the one-hole lug with an antioxidant compound before crimping. Also, bring any unplated mating surfaces to a shiny finish and coat with an antioxidant before mating. Plated mating surfaces must be clean and free from contamination. 1. Cut the ground cable to the desired length. The cable length must facilitate proper operation of the fault interrupt circuits. Dell EMC recommends using the shortest cable route allowable. 2. Take the one M4x0.7 screw from the package. 3. Attach the one-hole lug to the chassis using the supplied 10-32 screw with the captive internal tooth lock washer. Torque the screw to 20 in-lbs. 4. Attach the other end of the ground cable to a suitable ground point. The rack installation ears are not a suitable grounding point. Optics installation The S3048-ON has four SFP+ optical ports. For a list of supported optics, see the S3048-ON data sheet at www.dell.com/support or contact your Dell EMC representative. CAUTION: ESD damage can occur if components are mishandled. Always wear an ESD-preventive wrist or heel ground strap when handling the S3048-ON and its components. WARNING: When working with optical fibers, follow all warning labels and always wear eye protection. Never look directly into the end of a terminated or unterminated fiber or connector as it may cause eye damage. 1. Position the optic so it is in the correct position. The optic has a key that prevents it from being inserted incorrectly. 2. Insert the optic into the port until it gently snaps into place. NOTE: When you cable the ports, be sure not to interfere with the airflow from the small vent holes above and below the ports. Optics removal Remove an optic by pushing the tab on the optic and sliding the optic from the port. When removing optics with direct attach cables (DACs) from the port, pull the release tab firmly and steadily. Before pulling the release tab, you may need to gently push the optic into the port to ensure it is seated properly. Do not jerk or tug repeatedly on the tab. Switch power-up Supply power to the S3048-ON after it is mounted in a rack or cabinet. Dell EMC recommends reinspecting your switch before powering up. Verify the following: ● The equipment is properly secured to the rack and properly grounded, optional. ● The equipment rack is properly mounted and grounded, optional. 20 Install the S3048-ON
-
 1
1 -
2
-
3
-
4
-
5
-
6
-
7
-
8
-
9
-
10
-
11
-
12
-
13
-
14
-
 15
15 -
 16
16 -
 17
17 -
 18
18 -
 19
19 -
 20
20 -
 21
21 -
 22
22 -
 23
23 -
 24
24 -
 25
25 -
26
-
27
-
28
-
29
-
30
-
31
-
32
-
33
-
34
-
35
-
36
-
37
 |
 |
