Dell S4148U-ON Networking S4100-ON Series Set-Up Guide - Page 14
Four-post threaded installation
 |
View all Dell S4148U-ON manuals
Add to My Manuals
Save this manual to your list of manuals |
Page 14 highlights
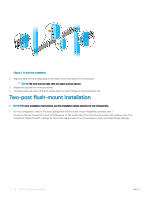
Figure 5. Two-post center-mount installation 2 Slide the back bracket towards the post. Secure it to the post flange with two user-supplied screws, items 2 and 3. 3 Repeat this procedure for the second rail. Four-post threaded installation NOTE: For more installation instructions, see the installation labels attached to the rail assembly. 1 Remove the latch castings from each end of the ReadyRails assemblies. To remove the two screws each latch casting, use a Torx driver. Retain the latch castings for future rack requirements. 14 S4100-ON Series installation
-
 1
1 -
2
-
3
-
4
-
5
-
6
-
7
-
8
-
 9
9 -
 10
10 -
 11
11 -
 12
12 -
 13
13 -
 14
14 -
 15
15 -
 16
16 -
 17
17 -
 18
18 -
 19
19 -
20
-
21
 |
 |

Figure 5. Two-post center-mount installation
2
Slide the back bracket towards the post. Secure it to the post
flange
with two user-supplied screws, items 2 and 3.
3
Repeat this procedure for the second rail.
Four-post threaded installation
NOTE:
For more installation instructions, see the installation labels attached to the rail assembly.
1
Remove the latch castings from each end of the ReadyRails assemblies. To remove the two screws each latch casting, use a Torx
driver.
Retain the latch castings for future rack requirements.
14
S4100–ON Series installation