Dell Studio One 19 1909 Studio One 19 Service Manual - Page 18
Removing the Processor Fan
 |
View all Dell Studio One 19 1909 manuals
Add to My Manuals
Save this manual to your list of manuals |
Page 18 highlights
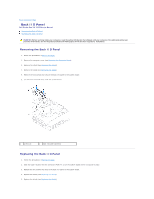
CAUTION: Incorrect alignment of the processor heat sink can cause damage to the system board and processor. 1. Follow the procedures in Before You Begin. NOTE: The original thermal grease can be reused if the original processor and processor heat sink are reinstalled together. If either the processor or the processor heat sink is replaced, use the thermal grease provided in the kit to ensure that thermal conductivity is achieved. 2. Clean the thermal grease from the bottom of the heat sink and reapply it. 3. Align the screws on the processor heat sink with the screw holes on the chassis. CAUTION: To prevent damage to the processor follow the marked sequence, this ensures equal pressure on the processor at all times. 4. Use the marked sequence on the processor heat sink to tighten the four captive screws at the lower end of the processor heat sink. 5. Replace the screw that secures the heat sink to the chassis. 6. Replace the back I/O panel (see Replacing the Back I/O Panel). 7. Replace the stand (see Replacing the Stand). 8. Replace the shield (see Replacing the Shield). 9. Replace the computer cover (see Replacing the Computer Cover). Removing the Processor Fan WARNING: Do not touch the fan when the computer is powered on. 1. Follow the procedures in Before You Begin. 2. Remove the computer cover (see Removing the Computer Cover). 3. Remove the shield (see Removing the Shield). 4. Remove the three screws securing the processor fan. 5. Disconnect the processor fan cable from the connector (CPU_FAN1) on the system board. 1 screws (3) 2 processor fan cable
-
 1
1 -
2
-
3
-
4
-
5
-
6
-
7
-
8
-
9
-
10
-
11
-
12
-
 13
13 -
 14
14 -
 15
15 -
 16
16 -
 17
17 -
 18
18 -
 19
19 -
 20
20 -
 21
21 -
 22
22 -
 23
23 -
24
-
25
-
26
-
27
-
28
-
29
-
30
-
31
-
32
-
33
-
34
-
35
-
36
-
37
-
38
-
39
-
40
-
41
-
42
-
43
-
44
-
45
-
46
-
47
-
48
-
49
-
50
-
51
-
52
-
53
 |
 |
