Dell Studio One 19 1909 Studio One 19 Service Manual - Page 9
Computer Cover
 |
View all Dell Studio One 19 1909 manuals
Add to My Manuals
Save this manual to your list of manuals |
Page 9 highlights
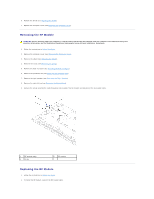
Back to Contents Page Computer Cover Dell Studio One 19/1909 Service Manual Removing the Computer Cover Replacing the Computer Cover WARNING: Before working inside your computer, read the safety information that shipped with your computer. For additional safety best practices information, see the Regulatory Compliance Homepage at www.dell.com/regulatory_compliance. WARNING: To guard against electrical shock, always unplug your computer from the electrical outlet before removing the computer cover. CAUTION: Ensure that sufficient space exists to support the system with the computer cover removed-at least 30 cm (1 ft.) of desk top space. Removing the Computer Cover 1. Follow the procedures in Before You Begin. CAUTION: Before opening your computer, ensure that you place the computer on a soft cloth or clean surface to avoid any scratches on the display. 2. Place the computer face down on a flat surface. 3. Starting at the groove at the bottom of the computer cover, use your fingers to separate the computer cover from the computer by lifting the insides of the computer cover. 4. Work around the computer cover and gently ease the computer cover away from the computer. 1 computer cover 2 groove 5. Lift the computer cover away from the computer and place it aside in a secure location. Replacing the Computer Cover 1. Follow the procedures in Before You Begin. 2. Position the computer cover over the computer. 3. Gently ease the pins into the holes on the shield. 4. Press down and push the computer cover along the edges until it snaps into place. 5. Connect your computer and all attached devices to electrical outlets, and turn them on.
-
 1
1 -
2
-
3
-
 4
4 -
 5
5 -
 6
6 -
 7
7 -
 8
8 -
 9
9 -
 10
10 -
 11
11 -
 12
12 -
 13
13 -
 14
14 -
15
-
16
-
17
-
18
-
19
-
20
-
21
-
22
-
23
-
24
-
25
-
26
-
27
-
28
-
29
-
30
-
31
-
32
-
33
-
34
-
35
-
36
-
37
-
38
-
39
-
40
-
41
-
42
-
43
-
44
-
45
-
46
-
47
-
48
-
49
-
50
-
51
-
52
-
53
 |
 |
