Dell Vostro 2420 Owner's Manual - Page 16
Installing the Palmrest, Flip the computer and install the screws that secure the bottom base. - keyboard removal
 |
View all Dell Vostro 2420 manuals
Add to My Manuals
Save this manual to your list of manuals |
Page 16 highlights
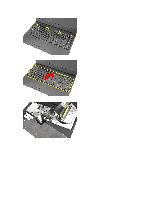
6. Remove the screws that secure the palmrest to the computer. 7. With a plastic carefully pry up the palmrest along the edges. Lift the palmrest and remove from the computer. Installing the Palmrest 1. Insert the palmrest towards the display screen at a 30-degree angle. 2. Starting from the edges of the palmrest, press downwards on the palmrest to engage the tabs on the computer. 3. Connect the power-board cable and touchpad cable to their respective connectors. 4. Install the screws that secure the palmrest to the computer. 5. Flip the computer and install the screws that secure the bottom base. 6. Install the keyboard. 7. Install the battery. 16
-
 1
1 -
2
-
3
-
4
-
5
-
6
-
7
-
8
-
9
-
10
-
 11
11 -
 12
12 -
 13
13 -
 14
14 -
 15
15 -
 16
16 -
 17
17 -
 18
18 -
 19
19 -
 20
20 -
 21
21 -
22
-
23
-
24
-
25
-
26
-
27
-
28
-
29
-
30
-
31
-
32
-
33
-
34
-
35
-
36
-
37
-
38
-
39
-
40
-
41
-
42
-
43
-
44
-
45
-
46
-
47
-
48
-
49
-
50
-
51
-
52
-
53
 |
 |

6.
Remove the screws that secure the palmrest to the computer.
7.
With a plastic carefully pry up the palmrest along the edges. Lift the palmrest and remove from the computer.
Installing the Palmrest
1.
Insert the palmrest towards the display screen at a 30–degree angle.
2.
Starting from the edges of the palmrest, press downwards on the palmrest to engage the tabs on the computer.
3.
Connect the power-board cable and touchpad cable to their respective connectors.
4.
Install the screws that secure the palmrest to the computer.
5.
Flip the computer and install the screws that secure the bottom base.
6.
Install the keyboard.
7.
Install the battery.
16