Dell W-Series 205H AP-205H-MNT2 Wall Mount Kit Installation Guide - Page 2
Installation for Single Gang Wall Box, Attaching Wall Mount to Single Gang Wall Box
 |
View all Dell W-Series 205H manuals
Add to My Manuals
Save this manual to your list of manuals |
Page 2 highlights
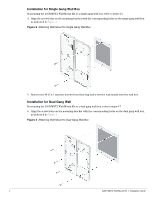
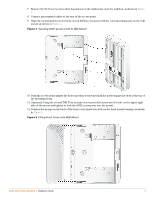
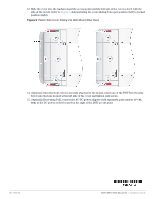
Installation for Single Gang Wall Box If mounting the 205H-MNT2 Wall Mount Kit to a single gang wall box, refer to steps 4-5. 4. Align the screw holes on the mounting bracket with the corresponding holes on the single gang wall box, as indicated in Figure 2. Figure 2 Attaching Wall Mount to Single Gang Wall Box 5. Remove the #6-32 x 1 machine screws from their bag and screw the wall mount onto the wall box. Installation for Dual Gang Wall If mounting the 205H-MNT2 Wall Mount Kit to a dual gang wall box, refer to steps 6-7. 6. Align the screw holes on the mounting bracket with the corresponding holes on the dual gang wall box, as indicated in Figure 3. Figure 3 Attaching Wall Mount to Dual Gang Wall Box 2 205H-MNT2 Wall Mount Kit | Installation Guide
-
 1
1 -
 2
2 -
 3
3 -
 4
4
 |
 |
