Dell W-Series 205H AP-205H-MNT2 Wall Mount Kit Installation Guide - Page 3
Securing 205H access point to Wall Mount, Fitting Front Cover onto Wall Mount,
 |
View all Dell W-Series 205H manuals
Add to My Manuals
Save this manual to your list of manuals |
Page 3 highlights
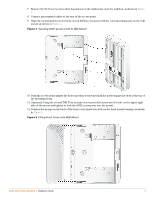
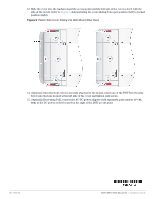
7. Remove the #6-32 screws from their bag and screw the wall mount onto the wall box, as shown in Figure 3. 8. Connect any required cables to the rear of the access point. 9. Align the mounting slots on the back of your 205H access point with the corresponding posts on the wall mount as shown in Figure 4. Figure 4 Securing 205H access point to Wall Mount 10. Push the access point against the holes and then downward until the posts engage the slots at the top of the mounting holes. 11. (Optional) Using the second T8H Torx security screw provided, insert into the hole on the upper-right side of the mount and tighten to lock the 205H access point into the mount. 12. Position the prongs on the back of the front cover inside the slots on the front mount housing, as shown in Figure 5. Figure 5 Fitting Front Cover onto Wall Mount 205H-MNT2 Wall Mount Kit | Installation Guide 3
-
 1
1 -
 2
2 -
 3
3 -
 4
4
 |
 |
