Dell Wyse 3020 Monitor mount for 2017 P-series monitors Installation guide - Page 7
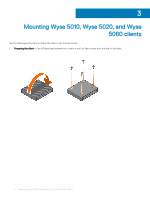
Mounting Wyse 5010, Wyse 5020, and Wyse 5060 clients
 |
View all Dell Wyse 3020 manuals
Add to My Manuals
Save this manual to your list of manuals |
Page 7 highlights
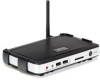
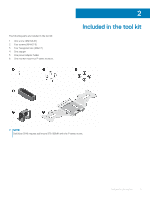
2 Attaching the client-Install the thin client on the P-series mount with the M4.07-6 screws included in the tool kit. NOTE: The power button should face outwards and air vents should be on top end for proper heat dissipation. 3 Attaching the power adapter holder-Slide the small hooks downward into the vertical slotted holes and the large hooks onto the top edge of the mount. Use the M2.5x0.45 screw to secure the power adapter holder onto the mount as indicated in the following illustration. 4 Removing the monitor stand a Place the monitor panel face down on a soft cloth or cushion. b Remove the stand from the monitor by pushing the monitor's quick release button as indicated in the following illustration. Mounting Wyse 5010, Wyse 5020, and Wyse 5060 clients 7
-
 1
1 -
 2
2 -
 3
3 -
 4
4 -
 5
5 -
 6
6 -
 7
7 -
 8
8 -
 9
9 -
 10
10 -
 11
11 -
 12
12 -
13
 |
 |
