Dell Wyse 3020 Monitor mount for 2017 P-series monitors Installation guide - Page 9
Do not over-tighten the screws., Reinstalling the monitor stand
 |
View all Dell Wyse 3020 manuals
Add to My Manuals
Save this manual to your list of manuals |
Page 9 highlights
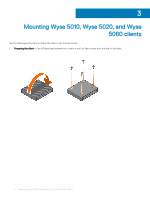
CAUTION: Do not over-tighten the screws. 6 Reinstalling the monitor stand-Insert the upper stand tabs into the dedicated space on the P-series mount and gently press down until the quick release button snaps into place. Place the monitor in the upright position. 7 Adjusting and securing monitor height (optional) • For portrait orientation-Raise the monitor to the maximum height and attach the stopper. Ensure that the arrow on the stopper is facing up and facing front side of the stand. Wrap the stopper around the stand and snap the ends. • For landscape orientation-Adjust the monitor height and attach stopper. Ensure that the arrow on the stopper is facing up and facing front side of the stand, and then snap the stopper ends. Mounting Wyse 5010, Wyse 5020, and Wyse 5060 clients 9
-
 1
1 -
2
-
3
-
 4
4 -
 5
5 -
 6
6 -
 7
7 -
 8
8 -
 9
9 -
 10
10 -
 11
11 -
 12
12 -
 13
13
 |
 |
