Dell Wyse 3030 LT Monitor mount for 2016 E-series and E2417H monitors Installa - Page 10
Wyse 3030/3030LT, Mounting Wyse 3010, Wyse 3020, and Wyse 5030 clients
 |
View all Dell Wyse 3030 LT manuals
Add to My Manuals
Save this manual to your list of manuals |
Page 10 highlights
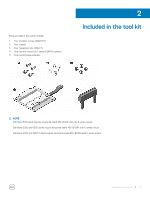
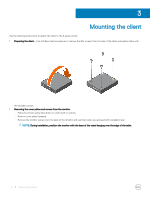
4 Mounting Wyse 3010, Wyse 3020, Wyse 3030, Wyse 3030LT, and Wyse 5030 clients Use the following instructions for mounting the Wyse 3010, Wyse 3020, Wyse 3030, Wyse 3030LT, and Wyse 5030 clients to the E-series monitor mount. These thin clients require mounting of the thin client to their respective horizontal stands before installing the thin client to the E-series monitor mount. The following horizontal stands are required by the respective thin client models: Table 1. Client name and part number Client name Wyse 3010 Wyse 3020/5030 Wyse 3030/3030LT Part number XXJ7P 92GX5 GYTXN 1 Preparing the client a If the thin client is installed on the horizontal stand, remove it from the stand. On the inside of the horizontal stand, slide one of the four hex nuts that comes with the tool kit into one of the four screw holes. b From outside of the horizontal stand, insert a shoulder screw into the hex nut and tighten it. c Repeat for remaining three hex nuts and shoulder screws. d Insert the client into the horizontal stand, with the power button facing upward, and the extended plastic ledge on the opposite side. NOTE: a Slide the hex nut across the stand surface so that it easily slips into the recessed cut-out in the horizontal stand. b Use the horizontal stand with the hex holes. 10 Mounting Wyse 3010, Wyse 3020, Wyse 3030, Wyse 3030LT, and Wyse 5030 clients
-
 1
1 -
2
-
3
-
4
-
 5
5 -
 6
6 -
 7
7 -
 8
8 -
 9
9 -
 10
10 -
 11
11 -
 12
12 -
 13
13
 |
 |
