Dell Wyse 3030 LT Monitor mount for 2016 E-series and E2417H monitors Installa - Page 6
Mounting the client, Remove the monitor screws from the back of the monitor
 |
View all Dell Wyse 3030 LT manuals
Add to My Manuals
Save this manual to your list of manuals |
Page 6 highlights
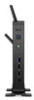
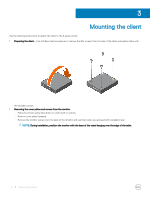
3 Mounting the client Use the following instructions to attach the client to the E-series mount: 1 Preparing the client-Use a Phillips-head screwdriver to remove the filler screws from the side of the client and replace them with the shoulder screws. 2 Removing the cover plates and screws from the monitor. • Place the monitor panel face down on a soft cloth or cushion. • Remove cover plate if present. • Remove the monitor screws from the back of the monitor, and use them when you proceed with installation later. NOTE: During installation, position the monitor with the base of the stand hanging over the edge of the table. 6 Mounting the client
-
 1
1 -
 2
2 -
 3
3 -
 4
4 -
 5
5 -
 6
6 -
 7
7 -
 8
8 -
 9
9 -
 10
10 -
 11
11 -
 12
12 -
13
 |
 |

Mounting the client
Use the following instructions to attach the client to the E-series mount:
1
Preparing the client
—Use a Phillips-head screwdriver to remove the
filler
screws from the side of the client and replace them with
the shoulder screws.
2
Removing the cover plates and screws from the monitor.
•
Place the monitor panel face down on a soft cloth or cushion.
•
Remove cover plate if present.
•
Remove the monitor screws from the back of the monitor, and use them when you proceed with installation later.
NOTE:
During installation, position the monitor with the base of the stand hanging over the edge of the table.
3
6
Mounting the client