Dell Wyse 3030 LT Monitor mount for 2016 E-series and E2417H monitors Installa - Page 13
To complete your setup, make all the desired connections, and then plug the AC power cord into an AC wall
 |
View all Dell Wyse 3030 LT manuals
Add to My Manuals
Save this manual to your list of manuals |
Page 13 highlights
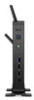
4 Attaching the client-Align the client, and insert the shoulder screws into the four cut-out areas of the mount. The security latch moves automatically when the shoulder screws are inserted. The security latch is highlighted with the number 1 in the following image. 1. Security latch. 5 Connecting cables-To complete your setup, make all the desired connections, and then plug the AC power cord into an AC wall outlet. Mounting Wyse 3010, Wyse 3020, Wyse 3030, Wyse 3030LT, and Wyse 5030 clients 13
-
 1
1 -
2
-
3
-
4
-
5
-
6
-
7
-
 8
8 -
 9
9 -
 10
10 -
 11
11 -
 12
12 -
 13
13
 |
 |

4
Attaching the client
–Align the client, and insert the shoulder screws into the four cut-out areas of the mount. The security latch
moves automatically when the shoulder screws are inserted. The security latch is highlighted with the number
1
in the following image.
1. Security latch.
5
Connecting cables
–To complete your setup, make all the desired connections, and then plug the AC power cord into an AC wall
outlet.
Mounting Wyse 3010, Wyse 3020, Wyse 3030, Wyse 3030LT, and Wyse 5030 clients
13