Dell XPS 8500 Owner's Manual (PDF) - Page 85
Front USB Panel, Prerequisites, Removing the Front USB Panel
 |
View all Dell XPS 8500 manuals
Add to My Manuals
Save this manual to your list of manuals |
Page 85 highlights
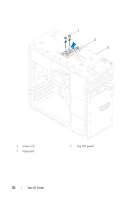
18 Front USB Panel WARNING: Before working inside your computer, read the safety information that shipped with your computer and follow the steps in "Before You Begin" on page 13. For additional safety best practices information, see the Regulatory Compliance Homepage at dell.com/regulatory_compliance. Prerequisites 1 Remove the computer cover. See "Removing the Computer Cover" on page 23. 2 Remove the front bezel. See "Removing the Front Bezel" on page 31. Removing the Front USB Panel CAUTION: When sliding the front USB panel out of the computer, be extremely careful. Carelessness may result in damage to the cable connectors and the cable routing clips. NOTE: Note the routing of all cables as you remove them so that you can re-route them correctly after you replace the front USB panel. 1 Disconnect the front USB panel cables from the system board connector F_USB2. See "System-Board Components" on page 21. 2 Remove the screw that secures the front USB panel to the front panel. 3 Slide the front USB panel down to release the clamps from the front panel and pull it away. Front USB Panel 85
-
 1
1 -
2
-
3
-
4
-
5
-
6
-
7
-
8
-
9
-
10
-
11
-
12
-
13
-
14
-
15
-
16
-
17
-
18
-
19
-
20
-
21
-
22
-
23
-
24
-
25
-
26
-
27
-
28
-
29
-
30
-
31
-
32
-
33
-
34
-
35
-
36
-
37
-
38
-
39
-
40
-
41
-
42
-
43
-
44
-
45
-
46
-
47
-
48
-
49
-
50
-
51
-
52
-
53
-
54
-
55
-
56
-
57
-
58
-
59
-
60
-
61
-
62
-
63
-
64
-
65
-
66
-
67
-
68
-
69
-
70
-
71
-
72
-
73
-
74
-
75
-
76
-
77
-
78
-
79
-
 80
80 -
 81
81 -
 82
82 -
 83
83 -
 84
84 -
 85
85 -
 86
86 -
 87
87 -
 88
88 -
 89
89 -
 90
90 -
91
-
92
-
93
-
94
-
95
-
96
-
97
-
98
-
99
-
100
-
101
-
102
-
103
-
104
-
105
-
106
-
107
-
108
-
109
-
110
-
111
-
112
-
113
-
114
-
115
-
116
-
117
-
118
-
119
-
120
-
121
-
122
-
123
-
124
-
125
-
126
-
127
-
128
-
129
-
130
-
131
-
132
-
133
-
134
-
135
-
136
 |
 |