Denon 1706 Owners Manual - Page 11
On/standby, On/source, Speaker A, Power, Mode 1, Setup Mic - test
 |
UPC - 081757506526
View all Denon 1706 manuals
Add to My Manuals
Save this manual to your list of manuals |
Page 11 highlights
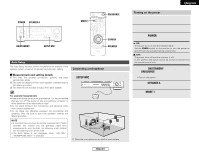
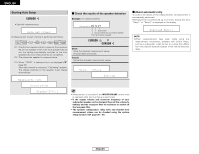
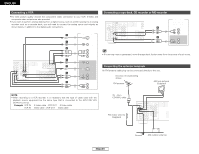
Easy Setup and Operation POWER SPEAKER A MODE 1 ON/SOURCE Turning on the power ENGLISH Easy Setup and Operation 1 Turn on your subwoofer. 2 Turn on your monitor (TV). ON/STANDBY SETUP MIC CURSOR SPEAKER Auto Setup The Auto Setup function of this unit performs an analysis of the speaker system to permit an appropriate automatic setting. Connecting a microphone 2 Measurement and setting details q: This sets the speaker connection, polarity, and bass reproduction ability. w: This sets the delay time from each speaker corresponding to the listening position. e: This sets the volume that is output from each speaker. 1 Connect the microphone for Auto Setup to the SETUP MIC jack on the front panel of the unit. For accurate measurements • Keep quiet during the auto setup procedure. It is recommended that you turn off the power of any air-conditioner, projector or other equipment that may produce noise. • Do not stand between the microphone and speakers while Auto Setup is performed. • Do not place any obstacles between the microphone and speakers. Also, be sure to point the speakers towards the listening position. 2 Place the microphone for Auto Setup at the actual listening position which will be at the same height as your ears. NOTE: • A loud test tone is output during the measurement. Please consider this should you be planning night time measurements, and consider not allowing small children into the listening room at this time. • The Auto Setup is not displayed when "MUTING", "HEADPHONE ONLY" is selected. Microphone Place the microphone on a tripod or level surface. 3 Press the POWER switch. ¢ ON: The power turns on and the indicator lights. Set the POWER switch to this position to turn the power on and off from the included remote control unit. £ OFF: The power turns off and the indicator is off. In this position, the power cannot be turned on and off from the remote control unit. 4 Press the ON/STANDBY switch on the main unit or ON/SOURCE button on the remote control unit. • Turn on the power. 5 Press the SPEAKER A button to turn the speakers on. 6 Set the MODE 1 switch to "AUDIO" (only when operating with the remote control unit). 8 ENGLISH
-
 1
1 -
2
-
3
-
4
-
5
-
 6
6 -
 7
7 -
 8
8 -
 9
9 -
 10
10 -
 11
11 -
 12
12 -
 13
13 -
 14
14 -
 15
15 -
 16
16 -
17
-
18
-
19
-
20
-
21
-
22
-
23
-
24
-
25
-
26
-
27
-
28
-
29
-
30
-
31
-
32
-
33
-
34
-
35
-
36
-
37
-
38
-
39
-
40
-
41
-
42
-
43
-
44
-
45
-
46
-
47
-
48
-
49
-
50
-
51
-
52
-
53
-
54
-
55
-
56
-
57
-
58
-
59
-
60
-
61
 |
 |
