Denon 1706 Owners Manual - Page 12
Cursor
 |
UPC - 081757506526
View all Denon 1706 manuals
Add to My Manuals
Save this manual to your list of manuals |
Page 12 highlights
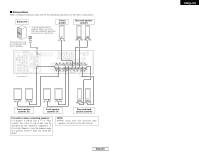
ENGLISH Easy Setup and Operation Starting Auto Setup 1 Press the CURSOR F button to start the Auto Setup. • Start the measurements. Auto Set
-
 1
1 -
2
-
3
-
4
-
5
-
6
-
 7
7 -
 8
8 -
 9
9 -
 10
10 -
 11
11 -
 12
12 -
 13
13 -
 14
14 -
 15
15 -
 16
16 -
 17
17 -
18
-
19
-
20
-
21
-
22
-
23
-
24
-
25
-
26
-
27
-
28
-
29
-
30
-
31
-
32
-
33
-
34
-
35
-
36
-
37
-
38
-
39
-
40
-
41
-
42
-
43
-
44
-
45
-
46
-
47
-
48
-
49
-
50
-
51
-
52
-
53
-
54
-
55
-
56
-
57
-
58
-
59
-
60
-
61
 |
 |

9
ENGLISH
Easy Setup and Operation
Easy Setup and Operation
ENGLISH
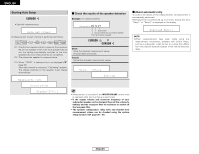
Starting Auto Setup
Measurement of each channel is performed as follows:
1
Press the
CURSOR
F
button to start the Auto
Setup.
• Start the measurements.
Auto Set <Start
FL
FR
C
SW
SL
SR
SBL
SBR
1
2
3
1:
Only the front speakers (A) are measured, front speakers
(B) are not available. Even if the front speakers (B) are
set, the setting automatically switches to the front
speakers (A) once measurements are completed.
2: The subwoofer speaker is measured twice.
3: When
“
ZONE2
”
is selected, this is not displayed (
page 43).
After each channel is measured,
“
Calculating
”
appears.
The display switches to the speaker check display
automatically.
Measure:FL <Ccl
Calculating
Speaker:3/4/.1
3
Disconnect the setup mic to finish Auto Setup.
•
Measurement is cancelled if the
MASTER VOLUME
control knob
is operated while the Auto Setup is performed.
•
If the output volume and crossover frequency of your
subwoofer speaker can be changed, then set the volume to
halfway and the crossover filter to maximum or switch off
the low-pass filter.
•
The speaker configuration, delay time and channel level
measurement values can be checked using the system
setup function (
page 38 ~ 41).
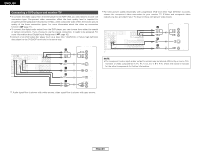
2
Check the results of the speaker detection
Example:
7.1-channel systems
Speaker:3/4/.1
Subwoofer
Surround and Surround back speaker
Front and Center speaker
2
Press the
CURSOR
D
or
H
button to select
“Store”, then press the
CURSOR
F
button.
Setup
<Store
Storing
Store:
Store the checked measurement values.
All parameters are stored.
Cancel:
Cancel the checked measurement values.
2
About automatic retry
To confirm the results of the measurements, remeasurement is
automatically performed.
Remeasurement is performed up to 2 times. During this time,
“
Retry1
”
or
“
Retry2
”
is displayed on the display.
Overload Retry1
NOTE:
•
When measurements have been made using the
measurement microphone, speakers with built-in filters,
such as a subwoofer, might be set to a value that differs
from the physical distance because of the internal electrical
delay.