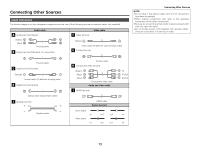
Denon AVR 2807 Owners Manual - English - Page 15
Preliminary measurements, Speaker measurements - no sound
 |
UPC - 081757507059
View all Denon AVR 2807 manuals
Add to My Manuals
Save this manual to your list of manuals |
Page 15 highlights
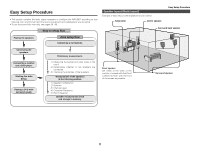
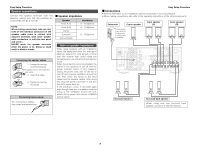
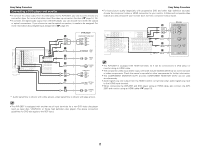
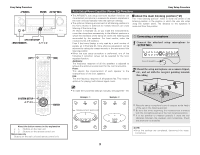
Easy Setup Procedure y Preliminary measurements This procedure is used to automatically determine the background noise, whether or not speakers are connected, and the polarities of the connected speakers. 1 Press D H to select "Start", then press F. • The preliminary measurements start. 2 Press D H to select "Speaker Detect Check", then press ENTER. 3 Press ENTER again. Cautions during measurements: • Loud test tones are output during the measurements. Be careful for example when small children are nearby. • Proper measurements may not be possible if there are obstacles between the speaker and the setup microphone. • During the measurements, do not stand between or near the speakers and setup microphone. • To avoid influencing the measurements, turn off the power of air-conditioners or any other equipment producing sound in the room. Perform the measurements with the room as quiet as possible. • Measurement is cancelled when VOLUME is operated while the Auto Setup is performed. Easy Setup Procedure 4 Press D H to select "Calculate", then press F. • The speaker is analyzed. Once the calculations are completed, a screen for confirming the results of the measurements appears. The amount of time required for the analysis depends on the number of speakers and the number of measuring points. The greater the number of speakers and measuring points, the longer the time required. 1 2 1 2 h (Screen after initial measurement) h (Press ENTER.) (After measurement completed) u Speaker measurements With these measurements, the "Speaker Configuration", "Distance", "Channel Level", "Crossover Frequency" and "Room EQ" settings are analyzed automatically. The main listening position is measured first, so leave the microphone where it is. 1 Press D H to select "OK Start", then press F. • Measurements for the first point start. 2 Move the microphone to the second point and press F. • Measurements for the second point start. Once the measurements are finished, the results of the measurements for the second point are displayed. 3 Perform step 2 repeatedly. Measurements can be ended when there are 6 or less measurement locations; however, to obtain better results, measurements at 6 locations is recommended. h 4 h h (After completion of measurement for first point) NOTE: • Do not change the speaker connections or subwoofer volume after making the measurements. • If the results are not as expected or if an error message is displayed, select "Retry" and perform the measurements again ( page 12). • If the results of remeasurement are still not as expected or if an error message is displayed, turn off the power switch and check the speaker connections. Then start the measurements again from the beginning. 11
-
 1
1 -
2
-
3
-
4
-
5
-
6
-
7
-
8
-
9
-
 10
10 -
 11
11 -
 12
12 -
 13
13 -
 14
14 -
 15
15 -
 16
16 -
 17
17 -
 18
18 -
 19
19 -
 20
20 -
21
-
22
-
23
-
24
-
25
-
26
-
27
-
28
-
29
-
30
-
31
-
32
-
33
-
34
-
35
-
36
-
37
-
38
-
39
-
40
-
41
-
42
-
43
-
44
-
45
-
46
-
47
-
48
-
49
-
50
-
51
-
52
-
53
-
54
-
55
-
56
-
57
-
58
-
59
-
60
-
61
-
62
-
63
-
64
-
65
-
66
-
67
-
68
-
69
-
70
-
71
-
72
-
73
-
74
-
75
-
76
-
77
-
78
-
79
-
80
-
81
-
82
-
83
-
84
-
85
-
86
-
87
-
88
 |
 |
