Denon AVR 2807 Owners Manual - English - Page 46
Power, Pure Direct, Night, Zone2/rec Select, Function
 |
UPC - 081757507059
View all Denon AVR 2807 manuals
Add to My Manuals
Save this manual to your list of manuals |
Page 46 highlights
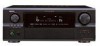
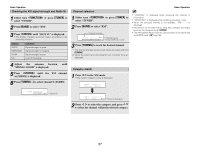
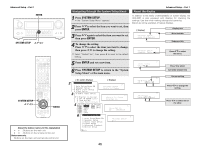
Advanced Operation About the button names in this explanation < > : Buttons on the main unit [ ] : Buttons on the remote control unit Button name only : Buttons on the main unit and remote control unit Recording (audio and/or video) 1 Press until "RECOUT" appears on the display. ZONE2 RECOUT 2 Use to select the source to be recorded (audio and/or video). • The " " indicator lights. 3 Record (the audio or video signals). For operations, see the operating instructions of the device from which you are recording (audio or video signals). Advanced Operation About the memory functions 2 Last function memory The various settings set when the AVR-2807's power is switched to standby are stored in the memory. When the power is turned back on, the settings made when the power was switched to standby are recalled. 2 Backup memory The various settings are stored in the memory for about 1 week, even when the power is turned off or the power cord is unplugged. Initialization of the microprocessor (Reset) • To cancel, press and set the function to "ZONE2". NOTE: • When the REC OUT mode is selected, [ZONE2] and [FUNCTION] (ZONE2) cannot be operated. • Digital signals are not output from the analog REC OUT, OPTICAL 3 OUT and OPTICAL 4 OUT terminals. Use the procedure described below to reset the microprocessor if the display is abnormal or if the buttons on the main unit or the remote control unit do not operate. 1 Switch off the unit using . 2 Hold the following and , and press . 3 Check that the entire display is blinking with an interval of about 1 second, and release your fingers from the 2 buttons. • The microprocessor will be initialized. • If step 3 does not work, start over from step 1. • If the microprocessor has been reset, all the settings are reset to the default values. 42
-
 1
1 -
2
-
3
-
4
-
5
-
6
-
7
-
8
-
9
-
10
-
11
-
12
-
13
-
14
-
15
-
16
-
17
-
18
-
19
-
20
-
21
-
22
-
23
-
24
-
25
-
26
-
27
-
28
-
29
-
30
-
31
-
32
-
33
-
34
-
35
-
36
-
37
-
38
-
39
-
40
-
 41
41 -
 42
42 -
 43
43 -
 44
44 -
 45
45 -
 46
46 -
 47
47 -
 48
48 -
 49
49 -
 50
50 -
 51
51 -
52
-
53
-
54
-
55
-
56
-
57
-
58
-
59
-
60
-
61
-
62
-
63
-
64
-
65
-
66
-
67
-
68
-
69
-
70
-
71
-
72
-
73
-
74
-
75
-
76
-
77
-
78
-
79
-
80
-
81
-
82
-
83
-
84
-
85
-
86
-
87
-
88
 |
 |
