Denon AVR-4311CI Owners Manual - English - Page 96
Manual Setup
 |
UPC - 883795001885
View all Denon AVR-4311CI manuals
Add to My Manuals
Save this manual to your list of manuals |
Page 96 highlights
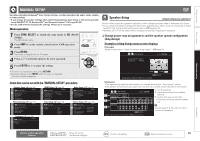
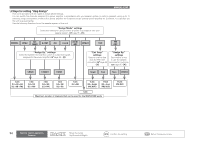
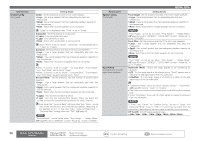
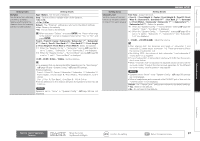
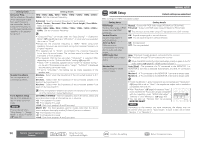
Simple version Basic version Advanced version MANUAL SETUP Set when changing Audyssey® Auto Setup settings, or when changing the audio, video, display or other settings. • If you change the speaker settings after performing Audyssey Auto Setup, it will not be possible to set MultEQ® XT 32, Dynamic EQ® and Dynamic Volume® (vpage 89, 90). • Can be used without changing the settings. Please set if necessary. Menu operation 1 Press ZONE SELECT to switch the zone mode to M (MAIN ZONE). The M indicator lights. 2 Press AMP to set the remote control unit to AMP-operation mode. 3 Press MENU. The menu is displayed on the TV screen. 4 Press ui to select the menu to be set or operated. 5 Press ENTER or p to enter the setting. • To return to the previous item, press RETURN. • Exiting the Menu, press MENU while the menu is displayed. The menu display disappears. Items that can be set with the "MANUAL SETUP" procedure Speaker Setup (vpage 93) SPEAKER SETUP Amp Assign Speaker Config. Bass Setting Distance Channel Level Crossover Freq. Network Setup (vpage 101) Change assigned power amp settings to match the spNeEaTkWeOr RsKysStEeTmUPconfiguration Network Connecting Other Rhapsody Account Napster Account Network Info Language (vpage 106) Make settings for wired LAN LANGUAGE English Français HDMI Setup (vpage 98) HDMI SETUP RGB Range Vertical Stretch Auto Lip Sync HDMI Audio Out Monitor Out HDMI Control Normal Enhanced Zone Setup (vpage 103) Make settings for RGB output range ZONE SETUP ZONE2 ZONE3 Bass Treble HPF Lch Level Rch Level Channel Make settings for audio playback in a ZONE 2 system Audio Setup (vpage 99) AUDIO SETUP EXT.IN Setup 2ch Direct/Stereo Auto Surround Mode EQ Customize Subwoofer Level Option Setup (vpage 104) Setup playback method for analog signals i n pu OPTION tOtePdTIfOroNmS EeTxUteP r n a l input connectors (EXT.IN) OPTION Volume Control Source Delete GUI Remote Preset Codes Quick Select Name Zone Rename Volume Display Volume Limit Power On Level Mute Level Make settings for volume control Speaker Setup Default settings are underlined. Perform when setting the speakers manually or when changing settings made in Audyssey Auto Setup. • If you change the speaker settings after performing Audyssey Auto Setup, it will not be possible to select MultEQ XT 32, Dynamic EQ and Dynamic Volume (vpage 89, 90). • MANUAL SETUP can be used without changing the settings. Please set if necessary. n Change power amp assignment to suit the speaker system configuration (Amp Assign) Examples of Amp Assign menu screen displays [1st page] Set items referring to "Steps for setting "Amp Assign"" (vpage 94). AMP ASSIGN [1/2] Assign Mode ZONE2 Assign Sp. F.WIDE ZONE2: ZONE3: RETURN Return Assign power amp to ZONE2 stereo signal [2nd page] • The signal being output by each speaker can change according to "Amp Assign" setting. • The speaker terminals and the output from the pre-out terminals can be checked on this screen. AMP ASSIGN q Current settings [2/2] w Signal being output from speaker q Assign Mode ZONE2 Assign Sp. F.WIDE terminal e Output from pre-out terminal w SPEAKERS R FRONT L CENTER R SURROUND L R SURR.BACK L R F.HEIGHT L R ZONE2 L • Terminals not being used are greyed out. e PRE OUT FL L R ZONE2 ZONE3 FR C SL SW1 SR FHL WL SW2 FHR WR RETURN Return See also page 5, 6, 56 - 62 for how to connect the speakers. Check signal output from speaker/PREOUT connectors Information Enter Select the lRangeumageoditspelayceod onn tthreoGlUIoscpreeenration buttons Move the cursor (Up/Down/Left/Right) Confirm the setting Return to previous menu 93
-
 1
1 -
2
-
3
-
4
-
5
-
6
-
7
-
8
-
9
-
10
-
11
-
12
-
13
-
14
-
15
-
16
-
17
-
18
-
19
-
20
-
21
-
22
-
23
-
24
-
25
-
26
-
27
-
28
-
29
-
30
-
31
-
32
-
33
-
34
-
35
-
36
-
37
-
38
-
39
-
40
-
41
-
42
-
43
-
44
-
45
-
46
-
47
-
48
-
49
-
50
-
51
-
52
-
53
-
54
-
55
-
56
-
57
-
58
-
59
-
60
-
61
-
62
-
63
-
64
-
65
-
66
-
67
-
68
-
69
-
70
-
71
-
72
-
73
-
74
-
75
-
76
-
77
-
78
-
79
-
80
-
81
-
82
-
83
-
84
-
85
-
86
-
87
-
88
-
89
-
90
-
 91
91 -
 92
92 -
 93
93 -
 94
94 -
 95
95 -
 96
96 -
 97
97 -
 98
98 -
 99
99 -
 100
100 -
 101
101 -
102
-
103
-
104
-
105
-
106
-
107
-
108
-
109
-
110
-
111
-
112
-
113
-
114
-
115
-
116
-
117
-
118
-
119
-
120
-
121
-
122
-
123
-
124
-
125
-
126
-
127
-
128
-
129
-
130
-
131
-
132
-
133
-
134
-
135
-
136
-
137
-
138
-
139
-
140
-
141
-
142
-
143
-
144
-
145
 |
 |
