Denon DN-C640 Operating Instructions - Page 42
CONTROL FEATURES, Machine Name text box, Set IP Address control, Password textbox, MAC Address - user manual
 |
UPC - 081757507608
View all Denon DN-C640 manuals
Add to My Manuals
Save this manual to your list of manuals |
Page 42 highlights
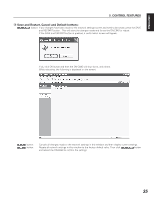
ENGLISH 5. CONTROL FEATURES (5) Network settings screen The Network settings screen allows you to modify the network settings of the DN-C640 as well as designate the location and sign-in information of the desired network shared folder. The function of all of the settings are the same as found in the Preset Menu. See page 20 about an operation of a preset menu. About detailed explanation of each network setting item, see below. !1 !2 !3 !4 !5 !6 !1 Machine Name text box: When in uploading audio files by an upload function, the DN-C640 upload audio files in a folder of this name under the shared folder. !2 Set IP Address control: You must set the DN-C640's network address here. If you connect the DN-C640 to the server using DHCP, check the Automatically(DHCP/Auto IP) radio button. The value of IP address, Subnet Mask, Default Gateway and DNS Server text boxes disappear. If you assign the network settings manually, check the "Manually" radio button and type the your desired IP address, Subnet Mask, Default Gateway and DNS Server text boxes. !3 Password textbox: If you want to have password security for access to the web remote, type password into Password textbox and Re-Enter Password textbox. !4 MAC Address indicator: Displays the MAC address of the DN-C640. !5 Network Shared Drive control: You must set the shared drive (folder) information here. Drive Name textbox: type the share name of the shared folder with full-pass. (Share name is generally same as a folder name.) Login User Name textbox: type a user account for accessing the shared folder. Login Password textbox: type a user account password for accessing the shared folder. Same password should be typed into Re-Enter Login Password textbox. 34
-
 1
1 -
2
-
3
-
4
-
5
-
6
-
7
-
8
-
9
-
10
-
11
-
12
-
13
-
14
-
15
-
16
-
17
-
18
-
19
-
20
-
21
-
22
-
23
-
24
-
25
-
26
-
27
-
28
-
29
-
30
-
31
-
32
-
33
-
34
-
35
-
36
-
 37
37 -
 38
38 -
 39
39 -
 40
40 -
 41
41 -
 42
42 -
 43
43 -
 44
44 -
 45
45 -
 46
46 -
 47
47 -
48
-
49
-
50
-
51
-
52
-
53
-
54
 |
 |
