Denon DN-T625 Operating Instructions - Page 13
THE COMPACT DISC, 9 CASSETTE TAPES, folder all-track repeat, All track repeat
 |
UPC - 081757505208
View all Denon DN-T625 manuals
Add to My Manuals
Save this manual to your list of manuals |
Page 13 highlights
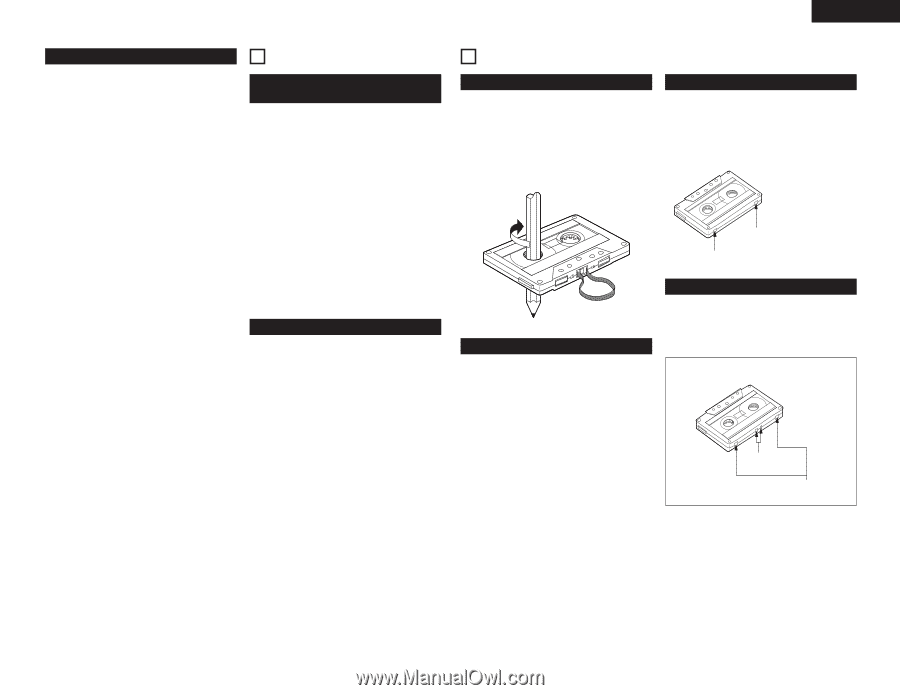
ENGLISH (4) Repeat playback 2 1-folder all-track repeat • Set the play mode to the single play mode. $2 1. In the stop mode, press the FOLDER button !1. • The "FOLDER" indicator lights. 2. Turn the select knob !2 to select the folder you want to listen to. • The folder name scrolls on the display. 3. Set the REPEAT switch $1 to the "ON" position. 4. Press the play/pause (1 3) button t. • Playback starts from the first track in the selected folder. • Once the last track in the selected folder has been played, playback resumes from the beginning of the first track in the selected folder and the tracks are repeated. ✽ When the TIME button !0 is pressed during playback, the track number of elapsed track time are displayed. (The "FOLDER" indicator do not turns off.) 2 All track repeat • Set the play mode to the continuous play mode. $2 1. In the stop mode, press the TITLE button !0 to turn on the "FILE" indicator. 2. Set the REPEAT switch $1 to the "ON" position. 3. Press the play/pause (1 3) button t. • The disc is played repeatedly. • Once the last track on the disc is played, playback continues from the beginning of the first track. 8 THE COMPACT DISC Precautions on handling compact discs • Do not allow fingerprints, oil or dust on the surface of the compact disc. If the signal surface is dirty, wipe it off with a soft, dry cloth. Wipe in circular motions from the center and out. • Do not use water, benzene, thinner, record sprays, electrostatic proof chemicals, or silicone-treated cloth to clean discs. • Always use care when handling discs to prevent damaging the surface, in particular when removing a disc from the case and returning it. • Do not bend compact discs. • Do not apply heat to compact discs. • Do not enlarge the hole in the center of the disc. • Do not write on the disc and do not attach any labels. • Condensation will from on the disc surface if it is brought into a warm room from a cold area, such as outdoors during winter. Wait until the condensation disappears. Never dry discs with hair dryers, etc.. Precautions on storage • After playing a disc, always return it to its case. • Keep discs in the cases when they are not to be played. This will protect them from dust and dirt and prolong their service life. • Do not store discs in the following places : 1) Places exposed to direct sunlight for a considerable time. 2) Places subject to accumulation of dust or high humidity. 3) Places exposed to high temperatures, such as close to heater outlets. 9 CASSETTE TAPES Handling precautions • C-120 cassette tapes C-120 cassette tapes are not recommended as they use a very thin tape base which may become tangled around the capstan or pinch roller. • Tape Slack Before putting a tape into the deck, take up any slack with a pencil or your finger tip. This precaution prevents the tape from becoming entangled around the capstan or pinch roller. Accidental erasure prevention • All cassettes have erasure prevention tabs for each side. To protect valuable recordings from accidental or inadvertent erasure, remove the tab for the appropriate side with a screwdriver or another tool. • To record on a tape whose erasure prevention tabs have been removed, cover the tab holes with adhesive tape. Erasure prevention tab for side A A Erasure prevention tab for side B Automatic tape selection Storage precautions This Stereo Cassette Deck contains an automatic tape selector which automatically selects the optimum bias and equalization for the tape in use. This is accomplished by detection of the tape type detections holes in the cassette housing. • Do not store cassette tapes in a place where they will be subject to : 1) Extremely high temperature or excessive moisture 2) Excessive dust 3) Direct sunlight 4) Magnetic fields (near TV sets or speakers) • To eliminate tape slack, store your cassettes in cassette cases with hub stops. • If a tape without tape type detection holes is used, the deck will be set for normal tapes. Detection holes for metal tape Detection holes for chrome tape 13
-
 1
1 -
2
-
3
-
4
-
5
-
6
-
7
-
 8
8 -
 9
9 -
 10
10 -
 11
11 -
 12
12 -
 13
13 -
 14
14 -
 15
15 -
 16
16 -
 17
17 -
 18
18 -
19
-
20
-
21
-
22
-
23
-
24
-
25
-
26
-
27
-
28
-
29
-
30
-
31
-
32
-
33
-
34
-
35
-
36
-
37
-
38
 |
 |