Denon DN-T625 Operating Instructions - Page 9
OPENING AND CLOSING THE DISC HOLDER AND LOADING A DISC, Opening and closing the disc holder - manual english
 |
UPC - 081757505208
View all Denon DN-T625 manuals
Add to My Manuals
Save this manual to your list of manuals |
Page 9 highlights
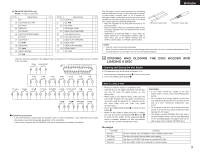
ENGLISH (2) PARALLEL (DN-T645 only) NOTE : All input is active low. Pin No. Signal Name I / O Pin No. Signal Name I / O 1 FG _ 20 CD PITCH - I 14 CD PITCH ON / OFF I 8 CD 6 I 2 CD PLAY I 21 CD SYNC. I 15 DECK FF I 9 CD FADER START I 3 CD PAUSE I 22 DECK COUNTER RESET I 16 DECK COUNTER MEMO I 10 Command common _ 4 CD CUE I 23 Command common _ 17 CD PITCH + I 11 DECK PLAY FORWARD I 5 CD 9 I 24 DECK STOP I 18 DECK REC I 12 DECK PLAY REVERSE I 6 CD 8 I 25 DECK PAUSE I 19 DECK REWIND I 13 CD STOP I 7 CD 7 I • Use the connection example in the diagram below as reference for connecting a parallel remote controller to the DN-T645. DECK CD FADER START 13 24 12 11 22 10 9 8 7 20 18 6 5 4 3 16 2 1 14 9 23 11 23 25 23 21 19 17 15 CD CD CD CD CD CUE CD CD The CD player uses a microcomputer for controlling internal electronic circuits. In the event that the player is used while a near-by tuner or TV is turned on, although unlikely, interference could occur either in the sound from the tuner or the picture of the TV. To avoid this, please take the following precautions. • Keep the CD player as far away from the tuner or TV set as possible. • Keep the power cable and connecting cable of the CD player separate from the antenna wires of the tuner and TV. • Interference is particular likely to occur when an indoor antenna or a 300 Ω/ohms feeder cable is used. Thus, use of an outdoor antenna and 75 Ω/ohms coaxial cable is strongly recommended. 300 Ω/ohms feeder cable 75 Ω/ohms coaxial cable NOTE : • Use this unit in a horizontal orientation. When the unit is used with the front panel facing upward (and the unit us in a vertical orientation) or when the front panel is on an incline, the unit will not operate properly. 4 OPENING AND CLOSING THE DISC HOLDER AND LOADING A DISC Opening and closing the disc holder ✽. This operation only works while the power is on. 1. Press the power operation switch q to turn on the power. 2. Press the OPEN/CLOSE button w. 2 23 3 23 4 23 5 23 6 23 7 23 8 23 12 23 CD PITCH DECK DECK CD PITCH DECK MEMO DECK CD PITCH ON/OFF CD DECK 23 13 23 14 23 15 23 16 23 17 23 18 23 19 20 23 DECK DECK DECK RESET CD SYNC. 21 23 22 23 24 23 25 23 2 Installation precautions • If the DN-T645/625 is placed near an amplifier, tuner or other components, noise (induced hum) or beat interference may result (especially during AM or FM reception). If this occurs, separate the DN-T645/625 from other components or reorient its position. How to load a disc • Make sure the disc holder is completely open. • Hold the disc by the edges and place it on the disc tray. (Do not touch the signal surface, i.e., the glossy side.) • When using 12 cm. diameter discs, make sure the outer edge matches the tray guide circumference and when using CD signals (8 cm. diameter) match the outer edge with the inner tray guide circumference. • Press the OPEN/CLOSE button w to close the disc holder #2. • When the disc holder is open and a disc is loaded, you may also press the play/pause (1 3) button t to close the disc holder. (If the play/pause (1 3) button is pressed, playback will start immediately upon the disc contents having been read.) CAUTIONS : • If you finger should get caught in the disc holder when it closes, press the OPEN/CLOSE button. • Do not place any foreign objects on the disc tray, and do not place more than one disc on the tray at a time. Otherwise malfunction may occur. • Do not push in the disc tray manually when the power is off as this may cause malfunction and damage the CD player. • This player can play CD-R/RW discs, but only if they are finalized. Note however that depending on the recording quality, the player may not be able to play some finalized CD-R/RW discs. Messages Message No Disc TOC Error Invalid CD Tray Error Meaning No disc inserted, disc unreadable or disc inserted upside down. The disc information has not been read properly. The disc is a CD-ROM that does not contain MP3 files. The disc holder could not be opened or closed properly. 9
-
 1
1 -
2
-
3
-
 4
4 -
 5
5 -
 6
6 -
 7
7 -
 8
8 -
 9
9 -
 10
10 -
 11
11 -
 12
12 -
 13
13 -
 14
14 -
15
-
16
-
17
-
18
-
19
-
20
-
21
-
22
-
23
-
24
-
25
-
26
-
27
-
28
-
29
-
30
-
31
-
32
-
33
-
34
-
35
-
36
-
37
-
38
 |
 |
