Denon DP-47F Operating Instructions - Page 5
Assem, Connec
 |
View all Denon DP-47F manuals
Add to My Manuals
Save this manual to your list of manuals |
Page 5 highlights
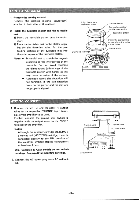
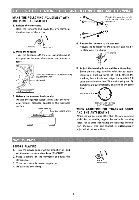
HOW ASSEM: 1. Remove the packing material Remove the packing material (styrofoam) attached to both sides of the cabinet. Align the square detection holes 2. Install the turntable platter and the turntable mat 1) Insert the turntable platter onto the motor shaft. 2) Place the turntable mat on the platter, aligning the size detection holes. For the protruding sections of the turntable mat into the outer square of the turntable platter. Notes: • • Be careful not to scratch the magnetic coating on the inner surface of the turntable. Further, avoid touching the diamond-cut (shiny) edge of the turntable platter with hands, as this may cause corrosion of the surface. Automatic record size detection will not function, if the size detection holes on the platter and the mat are not properly aligned. GO Diamond-cut edge f=I GC= mm Turntable mat Protruding section on the reverse side Turntable platter Insert the protruding sections into the outer square holes Motor shaft HOW TO CONNEC 1. Connect the left (L) and the right (R) output wires to the respective "PHONO" input terminals of the amplifier to be used. Further, connect the ground wire (which is together with the output wires) to the "GND" terminal of the amplifier. Notes: Although the auxiliary cartridge D L-80MC is a moving coil (MC TYPE) cartridge, it can be connected directly to the MM position of the amplifier without step-up transformers or head amplifiers. U.S., Canadian & Asian models do not include cartridge. See page 8 for mounting cartridge. 2. Connect the AC power plug to an AC wall outlet. Output cord Power cord AC wall outlet Amplifier 11s___ 00000 11 • O . . -liP .. Ground wire -5-
-
 1
1 -
 2
2 -
 3
3 -
 4
4 -
 5
5 -
 6
6 -
 7
7 -
 8
8 -
 9
9 -
 10
10
 |
 |
