Denon DP-47F Operating Instructions - Page 8
Replacement, Parts, Readjustments
 |
View all Denon DP-47F manuals
Add to My Manuals
Save this manual to your list of manuals |
Page 8 highlights
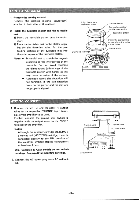
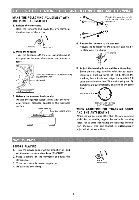
REPLACEMENT OF PARTS AND READJUSTMENTS Stylus replacement (U.K. model only) The stylus tip life of the attached cartridge is approximately 500 hours. Earlier replacement of the stylus is recommended, as a worn stylus tip may cause distorted sounds and damage to the records. • Be sure to ask for "DENON DSN-80" when purchasing a replacement stylus. There will be no guarantee on the performance and against malfunctions if a different stylus is used. • How to replace 1. Loosen the lock screw on the foremost end of the tonearm, and pull the head shell out in the direction of the arrow. 2. Remove four lead wires located at the back edge of the cartridge. 3. Holding the both sides of the stylus cover with your fingers, pull it out in the direction of the arrow in the figure. At this time, the terminals are also removed. 4. Attach a new replacement stylus to the cartridge until it is locked. 5. Connect the lead wires to the terminal. See the "Cartridge Replacement" for the connection. Pull out O Lock screw Head shell Replacement stylus DSN-80 Stylus assembly Lead wires Cartridge replacement A different cartridge with a weight between 3 and 12 g (including screws and nuts) can be attached to the head shell of this turntable unit. (When purchasing only the head shell, ask for the "DENON PCL-40".) • The overhang of this turntable unit is 16 mm. When the installation is performed as shown in the diagram, the proper overhang is obtained. Note: When the cartridge has been replaced, be sure to readjust the horizontal balance, tracking force and O-damping. • The color designation of the lead wires is as follows. Be careful not to make any errors. Red right channel (R) White left channel (L) Green right channel ground (RG) Blue left channel ground ( LG) • How to raise the stylus cover (For attached cartridge DL-80 or DL-160) • To protect the stylus tip, lower the stylus cover after use. Attach parallel to each other Head shell bottom view Attach vertically Head shell front view Stylus cover Before playing, raise the stylus cover in the direction of the arrow. -8-
-
 1
1 -
2
-
 3
3 -
 4
4 -
 5
5 -
 6
6 -
 7
7 -
 8
8 -
 9
9 -
 10
10
 |
 |
