Dewalt D55141FNBN Instruction Manual - Page 11
Compatibility, Location, PREPARATION FOR USE, Pre-Start Checklist Fig. 1
 |
View all Dewalt D55141FNBN manuals
Add to My Manuals
Save this manual to your list of manuals |
Page 11 highlights
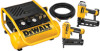
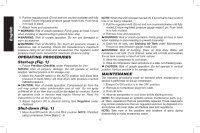
English If any of the above conditions cannot be met, or if operation of the compressor repeatedly causes interruption of the power, it may be necessary to operate it from a 20 amp circuit. It is not necessary to change the cord set. Compatibility Air tools and accessories that are run off the compressor must be compatible with petroleum-based products. If you suspect that a material is not compatible with petroleum products, an air line filter for removal of moisture and oil vapor in compressed air is required. NOTE: Always use an air line filter to remove moisture and oil vapor when spraying paint. Location Place the air compressor in a clean, dry and well ventilated area at least 12" (30.5 cm) away from the wall or other obstructions that will interfere with the flow of air. Keep the compressor away from areas that have dirt and/or volatile fumes in the atmosphere. These impurities may clog the intake filter and valves, causing inefficient operation. Warning: The air compressor pump and shroud are designed to allow for proper cooling. The ventilation openings on the compressor are necessary to maintain proper operating temperature. Do not place rags or other containers on or near these openings. Place the air compressor on a flat surface resting on the rubber feet. Noise Considerations Consult local officials for information regarding acceptable noise levels in your area. To reduce excessive noise, use vibration mounts or silencers, relocate the unit or construct total enclosures or baffle walls. Contact a DeWALT service center or call 1-800-4-DeWALT (1-800-433-9258) for assistance. Electrical Refer to all safety instructions before using unit. Observe extension cord safety instructions if necessary. Always move the On/Off switch (A) to the OFF position before removing the plug from the outlet. Transporting When transporting the compressor in a vehicle, trailer, etc., ensure that the tank is drained and the unit is secured. Use care when driving to avoid tipping the unit over in the vehicle. Damage can occur to the compressor or surrounding items if the compressor is tipped. MOVING When moving the compressor, grasp the handle and carry the compressor as close to the body as possible. WARNING: Ensure proper footing and use caution when carrying compressor to avoid a loss of balance. Preparation For Use WARNING: Do not operate this unit until you read and understand this instruction manual for safety, operation and maintenance instructions. Pre-Start Checklist (Fig. 1) 1. Ensure the Auto/Off switch (A) is in the OFF position. 2. Plug the power cord into the correct branch circuit receptacle. See Voltage and Circuit Protection under Installation. 3. Ensure air tank is drained, see Draining Air Tank under Maintenance. 4. Ensure the drain valve (H) is closed. 5. Ensure safety valve (G) is functioning properly, see Checking Safety Valve under Maintenance. 11
-
 1
1 -
2
-
3
-
4
-
5
-
 6
6 -
 7
7 -
 8
8 -
 9
9 -
 10
10 -
 11
11 -
 12
12 -
 13
13 -
 14
14 -
 15
15 -
 16
16 -
17
-
18
-
19
-
20
-
21
-
22
-
23
-
24
-
25
-
26
-
27
-
28
-
29
-
30
-
31
-
32
-
33
-
34
-
35
-
36
-
37
-
38
-
39
-
40
-
41
-
42
-
43
-
44
-
45
-
46
-
47
-
48
-
49
-
50
-
51
-
52
-
53
-
54
-
55
-
56
 |
 |