Dewalt D55141FNBN Instruction Manual - Page 13
Maintenance Chart, Checking Safety valVe, Draining Air Tank Fig. 1, Accessories
 |
View all Dewalt D55141FNBN manuals
Add to My Manuals
Save this manual to your list of manuals |
Page 13 highlights
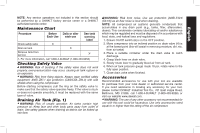
English NOTE: Any service operations not included in this section should be performed by a DeWALT factory service center or a DeWALT authorized service center. Maintenance Chart Procedure Before Daily or after Each Use each use See tank warning label Check safety valve X Drain air tank X Remove tank from service X1 1- For more information, call 1-800-4-DeWALT (1-800-433-9258) Checking Safety Valve Warning: Risk of bursting. If the safety valve does not work properly, over-pressurization may occur, causing air tank rupture or an explosion. Warning: Risk from flying objects. Always wear certified safety equipment: ANSI Z87.1 eye protection (CAN/CSA Z94.3) with side shields when using the compressor. Before starting compressor, pull the ring on the safety valve to make sure that the safety valve operates freely. If the valve is stuck or does not operate smoothly, it must be replaced with the same type of valve. Draining Air Tank (Fig. 1) Warning: Risk of unsafe operation. Air tanks contain high pressure air. Keep face and other body parts away from outlet of drain. Use safety glasses when draining as debris can be kicked up into face. Warning: Risk from noise. Use ear protection [ANSI S12.6 (S3.19)] as air flow noise is loud when draining. NOTE: All compressed air systems generate condensate that accumulates in any drain point (e.g., tanks, filter, aftercoolers, dryers). This condensate contains lubricating oil and/or substances which may be regulated and must be disposed of in accordance with local, state, and federal laws and regulations. 1. Ensure On/Off switch (A) is in the OFF position. 2. Move compressor into an inclined position so drain valve (H) is at the lowest point (this will assist in removing moisture, dirt, etc. from air tanks) 3. Place a suitable container under the drain valve to catch discharge. 4. Grasp black lever on drain valve. 5. Slowly rotate lever to gradually bleed air from air tank. 6. When air tank pressure gauge reads 10 psi, rotate valve to the fully open position. 7. Close drain valve when finished. Accessories Recommended accessories for use with your tool are available for purchase from your local dealer or authorized service center. If you need assistance in locating any accessory for your tool, please contact DeWALT Industrial Tool Co., 701 East Joppa Road, Baltimore, MD 21286, call 1-800-4-DeWALT (1-800-433-9258) or visit our website www.dewalt.com. Warning: The use of any other accessory not recommended for use with this tool could be hazardous. Use only accessories rated equal to or higher than the rating of the air compressor. 13
-
 1
1 -
2
-
3
-
4
-
5
-
6
-
7
-
 8
8 -
 9
9 -
 10
10 -
 11
11 -
 12
12 -
 13
13 -
 14
14 -
 15
15 -
 16
16 -
 17
17 -
 18
18 -
19
-
20
-
21
-
22
-
23
-
24
-
25
-
26
-
27
-
28
-
29
-
30
-
31
-
32
-
33
-
34
-
35
-
36
-
37
-
38
-
39
-
40
-
41
-
42
-
43
-
44
-
45
-
46
-
47
-
48
-
49
-
50
-
51
-
52
-
53
-
54
-
55
-
56
 |
 |
