Dewalt DXGN4500 Instruction Manual - Page 13

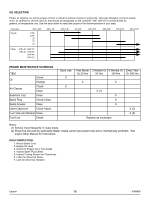
General Wattage Guide - radio

Page 13 highlights

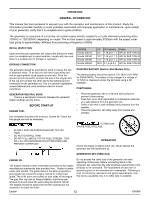
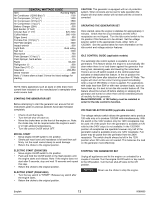
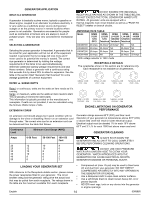
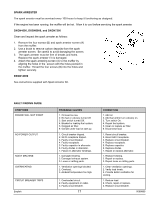
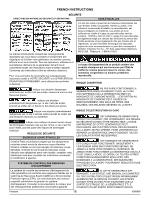
GENERAL WATTAGE GUIDE Item Running Watts Air Conditioner (12000 Btu 1750 Air Compressor (1/2 hp 1400 Air Compressor (3/4 hp 1800 Air Compressor (1 hp 2000 Battery Charger (25A 600 Belt Sander (3" belt 1000 Circular Saw (7 1/4 825-1050 Coffee Maker 900-1100 Edger (lawn 550 Furnace Fan (1/3 hp 1200 Hot Plate (single 1500 Impact wrench 600 Light Bulb Bulb rating Nail Gun 1200 Microwave 750 Paint Sprayer (1/3 hp 650 Paint Sprayer, hand-airless 175 Radio 50-200 Refrigerator 600 Table Saw (10 2000 Television 250-550 Weed Trimmer 500 Note: (*) Items allow at least 3 times the listed wattage for starting. NOTE: Many appliances such as saws or drills draw more current than indicated on the manufacturer's nameplate when under severe load. STARTING THE GENERATOR SET Before attempting to start the generator set, ensure that all instructions given in previous sections have been followed completely. • Check oil and fuel levels. • Turn the fuel shut-off valve on. • Move the choke lever on the front of the engine on. Note: the choke may not be required when the engine is warm or in high ambient temperatures. • Turn idle-control On/Off switch OFF. RECOIL START • Move engine On/Off switch to On position. • Slowly pull recoil cord until resistance is felt and then pull firmly. Let the recoil rewind slowly to avoid damage. • Return the choke to the original position. CAUTION: This generator is equipped with an oil protection system. When oil levels are too low for safe operation the engine will shut down and/or will not start until the oil level is corrected. OPERATING THE GENERATOR SET Once started, allow the engine to stabilize for approximately 3 minutes. Check that the circuit breakers and the GFCI receptacles are not tripped. Turn the idle-control switch to the On position if this feature is to be utilized. Set the voltage selector switch to the appropriate mode, either 120V or 120/240V. See the guides below for more information on the idle-control and voltage selector features. IDLE CONTROL GUIDE (applicable models) The automatic idle control system is available on some generators. This feature allows the engine to automatically idle down when there is no load drawn against the generator thus saving fuel, decreasing wear and lowering the noise level. There is an on-off switch located on the control panel that activates or deactivates this feature. In the on position the engine will idle down after detection of less than 40 Watts. The engine will return to the correct running speed immediately when a load of 350 Watts or more is applied. For applications with loads less than 50W or with near constant loads, such as home back up, it is best to turn the idle control feature off. The feature should be turned off before starting or stopping the generator and turned on when there will be extended periods of inactivity for the generator. Model DXGN14000: A 12V battery must be installed in order for the idle control to function. VOLTAGE SELECTOR GUIDE (applicable models) The voltage selector switch allows the generator set to produce 120 volts only or to produce 120/240 volts simultaneously. With the switch in the 120V position only the 120V receptacles may be used. All of the power from the generator is available at 120 volts but the 240V output is not available. In the 120/240V position all receptacles are operable however only half of the generator output is available at any one 120V receptacle. Full power may be pulled from the generator from the 240V receptacle. The switch should always be left in the 120V position when 240 volts are not needed. This balances the load on the generator more effectively. ELECTRIC START (DXGN7200) • Move engine On/Off switch to On position. • Push and hold the On/Off switch in the Start position until the engine starts and release. Note: If the engine does not start after 5 seconds, stop and wait 10 seconds and repeat this step. • Return the choke to the original position. ELECTRIC START (DXGN14000) • Turn the key switch to "START". Release key switch after the engine starts. • Return the choke to the original position. STOPPING THE GENERATOR SET Unplug all appliances and let the engine run unloaded for a couple of minutes. Turn the engine On/Off switch or key switch to the Off position. Turn the fuel shut-off valve to the Off position. NOTICE: Never use the choke to stop the engine. English 13 0068660

  • 1
  • 2
  • 3
  • 4
  • 5
  • 6
  • 7
  • 8
  • 9
  • 10
  • 11
  • 12
  • 13
  • 14
  • 15
  • 16
  • 17
  • 18
  • 19
  • 20
  • 21
  • 22
  • 23
  • 24
  • 25
  • 26
  • 27
  • 28
  • 29
  • 30
  • 31
  • 32
  • 33
  • 34
  • 35
  • 36
  • 37
  • 38
  • 39
  • 40

NOTE: Many appliances such as saws or drills draw more
current than indicated on the manufacturer’s nameplate when
under severe load.
STARTING THE GENERATOR SET
Before attempting to start the generator set, ensure that all
instructions given in previous sections have been followed
completely.
Check oil and fuel levels.
Turn the fuel shut-off valve on.
Move the choke lever on the front of the engine on. Note:
the choke may not be required when the engine is warm
or in high ambient temperatures.
Turn idle-control On/Off switch OFF.
RECOIL START
Move engine On/Off switch to On position.
Slowly pull recoil cord until resistance is felt and then pull
firmly. Let the recoil rewind slowly to avoid damage.
Return the choke to the original position.
ELECTRIC START (DXGN7200)
Move engine On/Off switch to On position.
Push and hold the On/Off switch in the Start position until
the engine starts and release. Note: If the engine does not
start after 5 seconds, stop and wait 10 seconds and repeat
this step.
Return the choke to the original position.
ELECTRIC START (DXGN14000)
Turn the key switch to "START". Release key switch after
the engine starts.
Return the choke to the original position.
CAUTION:
This generator is equipped with an oil protection
system. When oil levels are too low for safe operation the
engine will shut down and/or will not start until the oil level is
corrected.
OPERATING THE GENERATOR SET
Once started, allow the engine to stabilize for approximately 3
minutes.
Check that the circuit breakers and the GFCI
receptacles are not tripped.
Turn the idle-control switch to the
On position if this feature is to be utilized.
Set the voltage
selector switch to the appropriate mode, either 120V or
120/240V.
See the guides below for more information on the
idle-control and voltage selector features.
IDLE CONTROL GUIDE (applicable models)
The automatic idle control system is available on some
generators. This feature allows the engine to automatically idle
down when there is no load drawn against the generator thus
saving fuel, decreasing wear and lowering the noise level.
There is an on-off switch located on the control panel that
activates or deactivates this feature. In the on position the
engine will idle down after detection of less than 40 Watts. The
engine will return to the correct running speed immediately
when a load of 350 Watts or more is applied. For applications
with loads less than 50W or with near constant loads, such as
home back up, it is best to turn the idle control feature off. The
feature should be turned off before starting or stopping the
generator and turned on when there will be extended periods
of inactivity for the generator.
Model DXGN14000:
A 12V battery must be installed in
order for the idle control to function.
VOLTAGE SELECTOR GUIDE (applicable models)
The voltage selector switch allows the generator set to produce
120 volts only or to produce 120/240 volts simultaneously. With
the switch in the 120V position only the 120V receptacles may
be used. All of the power from the generator is available at 120
volts but the 240V output is not available. In the 120/240V
position all receptacles are operable however only half of the
generator output is available at any one 120V receptacle. Full
power may be pulled from the generator from the 240V
receptacle. The switch should always be left in the 120V
position when 240 volts are not needed. This balances the load
on the generator more effectively.
STOPPING THE GENERATOR SET
Unplug all appliances and let the engine run unloaded for a
couple of minutes. Turn the engine On/Off switch or key switch
to the Off position. Turn the fuel shut-off valve to the Off
position.
Never use the choke to stop the engine.
13
0068660
Item
Running Watts
Air Conditioner (12000 Btu) (*)
. . . . . . . . . . . . . . . . . . .1750
Air Compressor (1/2 hp) (*)
. . . . . . . . . . . . . . . . . . . . . .1400
Air Compressor (3/4 hp) (*)
. . . . . . . . . . . . . . . . . . . . . .1800
Air Compressor (1 hp) (*)
. . . . . . . . . . . . . . . . . . . . . . .2000
Battery Charger (25A)
. . . . . . . . . . . . . . . . . . . . . . . . . . .600
Belt Sander (3” belt)
. . . . . . . . . . . . . . . . . . . . . . . . . . .1000
Circular Saw (7 1/4”)
. . . . . . . . . . . . . . . . . . . . . . . 825-1050
Coffee Maker
. . . . . . . . . . . . . . . . . . . . . . . . . . . . . 900-1100
Edger (lawn) . . . . . . . . . . . . . . . . . . . . . . . . . . . . . . . . . . .550
Furnace Fan (1/3 hp) (*) . . . . . . . . . . . . . . . . . . . . . . . . .1200
Hot Plate (single) . . . . . . . . . . . . . . . . . . . . . . . . . . . . . .1500
Impact wrench
. . . . . . . . . . . . . . . . . . . . . . . . . . . . . . . . .600
Light Bulb
. . . . . . . . . . . . . . . . . . . . . . . . . . . . . . .Bulb rating
Nail Gun . . . . . . . . . . . . . . . . . . . . . . . . . . . . . . . . . . . . .1200
Microwave
. . . . . . . . . . . . . . . . . . . . . . . . . . . . . . . . . . . .750
Paint Sprayer (1/3 hp) (*)
. . . . . . . . . . . . . . . . . . . . . . . .650
Paint Sprayer, hand-airless
. . . . . . . . . . . . . . . . . . . . . . .175
Radio . . . . . . . . . . . . . . . . . . . . . . . . . . . . . . . . . . . . . .50-200
Refrigerator (*) . . . . . . . . . . . . . . . . . . . . . . . . . . . . . . . . .600
Table Saw (10”) (*) . . . . . . . . . . . . . . . . . . . . . . . . . . . . .2000
Television . . . . . . . . . . . . . . . . . . . . . . . . . . . . . . . . . .250-550
Weed Trimmer
. . . . . . . . . . . . . . . . . . . . . . . . . . . . . . . . .500
Note: (*) Items allow at least 3 times the listed wattage for
starting.
GENERAL WATTAGE GUIDE
English
NOTICE: