Dirt Devil M082476 Revision 5 (4/2003) - Page 6
Please refer to Diagram, for the instructions below.
 |
View all Dirt Devil M082476 manuals
Add to My Manuals
Save this manual to your list of manuals |
Page 6 highlights
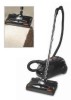
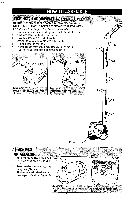
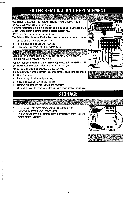
NOTE: Please refer to Diagram I for the instructions below. 1. Snap together the two interlocking wands until pin locks in place. 2. Push assembled wands into power nozzle. 3. Press cord into slots on back of wands 4. Insert handle end of hose into assembled wands. 5. Plug cord into cuff of handle. many combinations of wands and tools. 2. Press the release button to open tool caddy door (Diagram 1). Attachments are stored on board in their respective locations(Diagram 2)
-
 1
1 -
 2
2 -
 3
3 -
 4
4 -
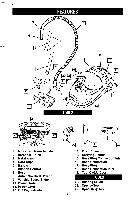 5
5 -
 6
6 -
 7
7 -
 8
8 -
 9
9 -
 10
10 -
 11
11 -
 12
12 -
13
-
14
-
15
-
16
-
17
-
18
-
19
-
20
-
21
-
22
-
23
-
24
-
25
-
26
-
27
-
28
-
29
-
30
-
31
-
32
-
33
-
34
-
35
 |
 |

NOTE:
Please refer to Diagram
I
for the instructions below.
1.
Snap together the two interlocking wands until pin locks in place.
2.
Push assembled wands into power nozzle.
3.
Press cord into slots on back of wands
4.
Insert handle end of hose into assembled wands.
5.
Plug cord into cuff of handle.
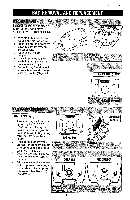
many combinations of wands and
tools.
2.
Press the release button to open tool
caddy door (Diagram
1).
Attachments are stored on board in
their respective locations (Diagram
2)