Dirt Devil M085580 Revision 1 (11/2004) - Page 4
Tool Caddy, Hose, And Tool Assembly: Continued, How To Operate, Paper Bag: Removal & Replacement
 |
View all Dirt Devil M085580 manuals
Add to My Manuals
Save this manual to your list of manuals |
Page 4 highlights
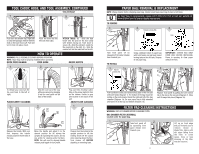
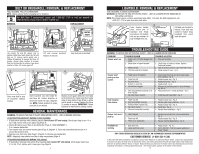
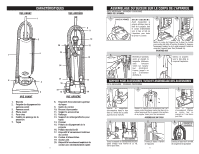
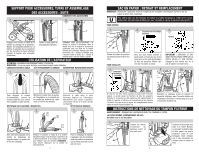
TOOL CADDY, HOSE, AND TOOL ASSEMBLY: CONTINUED TOOL STORAGE 7. 8. 9. A C B Push back dirt window flap. Align tabs on clear dirt passage window with the slots on the lower hose cuff. Push and turn to lock into place (inset). Place the hose into the two side hose clips. ATTACH TOOLS: (A) - Slide the dust brush onto the post on the tool caddy with bristles facing out. Push down to secure. (B) - Slide the extension wand into the round slot on the right. (C) - Slide the crevice tool into the round slot on the left. HOW TO OPERATE WARNING: FULLY ASSEMBLE CLEANER BEFORE OPERATING. NOTE: Paper bag must be properly installed before operating. QUICK CORD RELEASE CORD GUIDE ON/OFF SWITCH 1. 2. 3. PAPER BAG: REMOVAL & REPLACEMENT NOTE: Unplug cleaner before changing paper bag. Cleaner must have paper bag in place at all times. BAG TYPE U For Bag Type U replacements, please call 1-800-321-1134 or visit our website at www.dirtdevil.com to locate a dealer nearest you. TO REMOVE 1. 2. 3. Raised Locking Tab Hole Take front panel off by squeezing front panel release lever towards you. TO INSTALL 1. Raised 1a. Locking Tab Grasp cardboard collar of paper bag with both hands and pull past raised locking tabs on the dirt tube. Dispose of old paper bag. IMPORTANT: EXTEND BAG AWAY FROM HOLE BEFORE INSTALLING. Press in opening to clear paper away from hole. 1b. 2. 2a. Slot To release your cord, turn the top cord hook to the left or right. FLOOR/CARPET CLEANING 1. Keep the cord out of the way while you vacuum by snapping it into the cord guide on the back of the handle. 2. A B Plug cord into electrical outlet. Step on the power switch to turn on the cleaner. Switch is grey and located on the base of the unit. ABOVE FLOOR CLEANING 1. C Release the handle. With your foot, depress the handle release pedal on the left side of the base. Move the handle and adjust it to the desired position for (A) storing the upright, (B) operating the cleaner, and (C) low profile for cleaning under furniture. NOTE: You will need to depress handle release pedal again for low profile. 7 Cleaner must be locked in the upright position to lift the rotating brush off the carpet when cleaning above the floor. Turn cleaner off BEFORE attaching or removing hose. Push cardboard collar past raised locking tabs on the dirt tube with both hands (Diagram 1). The bottom of the bag should be resting on the posts located inside the right and left of the bag chamber (Diagram 1a). Be sure paper bag is fully extended and tucked in at the top and bottom (Diagram 1b). Tab Replace front panel by putting the one bottom tab in the slot on the vacuum (Diagram 2). Close until it snaps into place (Diagram 2a). FILTER PAD CLEANING INSTRUCTIONS WARNING: UNPLUG CLEANER BEFORE CHANGING FILTER. BAG CHAMBER FILTER (INTERNAL) Located under the paper bag. 1. Take front panel off 2. Lift up on front edge by squeezing front and pull towards you to panel release lever remove. Brush or towards you. shake filter debris until dirt stops falling from the filter. In some cases, more or less cleaning of the filter may be required. 8
-
 1
1 -
 2
2 -
 3
3 -
 4
4 -
 5
5 -
 6
6 -
 7
7 -
 8
8 -
 9
9 -
 10
10 -
11
-
12
-
13
-
14
-
15
 |
 |