Dirt Devil ND40100 Revision 1 (6/2010) - Page 9
Troubleshooting, Operation
 |
View all Dirt Devil ND40100 manuals
Add to My Manuals
Save this manual to your list of manuals |
Page 9 highlights
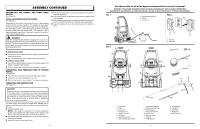
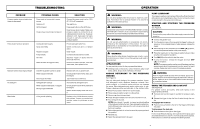
TROUBLESHOOTING Problem Pressure washer does not start when trigger is depressed Possible Cause Power cord not connected to power source Switch is off GFCI is tripped House/shop circuit breaker is tripped Pump doesn't produce pressure Inadequate water supply Spray wand leaks Nozzle is clogged Pump is faulty Air in line Water inlet filter is clogged or dirty Solution Connect the power cord to a live 120V AC, 60 Hz AC receptacle. Turn switch on. Press reset button on the GFCI plug. Reset house/shop breaker. Make sure pressure washer is connected to an individual branch circuit only. If using an extension cord, make sure it is heavy enough to carry the current of the pressure washer. Provide adequate water flow. Check connections and / or replace wand. Clean nozzle. Contact authorized service center. Squeeze trigger on spray wand to remove air from line. Remove the water inlet filter, rinse with warm water, then replace in unit. Machine doesn't reach high pressure No detergent Diameter of garden hose is too small Water supply is restricted Not enough inlet water Detergent tank is empty Water supply is inadequate or clogged Wrong nozzle is attached Wand leaks O-ring needs replacing Replace with 3/4 in. garden hose. Check garden hose for kinks, leaks, and blockages. Open water source full force. Add additional detergent to tank. Check garden hose for kinks, leaks and blockages. Attach variable spray wand and set to (-) Replace o-ring. If this does not correct the problem, contact your authorized service center to purchase a new wand. 12 operation WARNING: Do not allow familiarity with the product to make you careless. Remember that a careless fraction of a second is sufficient to inflict serious injury. WARNING: Always wear eye protection with side shields marked to comply with ANSI Z87.1. Failure to do so could result in objects being thrown into your eyes resulting in possible serious injury. WARNING: Do not use any attachments or accessories not recommended by the manufacturer of this product. The use of attachments or accessories not recommended can result in serious personal injury. WARNING: Never direct a water stream toward people or pets, or any electrical device. Failure to heed this warning could result in serious injury. Applications You may use this product for the purposes listed below: Cleaning boats, motorcycles, outdoor furniture, grills, house siding, patios, steps, decks, walkways, driveways adding detergent to the pressure washer See Figure 8. Use only detergents designed for pressure washers; household detergents, acids, alkalines, bleaches, solvents, flammable material, or industrial grade solutions can damage the pump. Many detergents may require mixing prior to use. Prepare cleaning solution as instructed on the solution bottle. Disconnect pressure washer from power supply. Place pressure washer upright on a flat surface. Remove cap from detergent tank. Press detergent release button and remove tank from unit. Pour detergent into tank. NOTE: Use a funnel, if needed, to prevent accidental spilling of the detergent outside the tank. If any detergent is spilled during the filling process, make sure the unit is cleaned and dried before proceeding. Return detergent tank to unit and be sure it is properly put back into position. Reinstall cap. Select the detergent tank to be used. pump lubricant The pressure washer pump has been filled with sufficient lubricant at the factory and is maintenance free. You do not need to check or add lubricant to the pump before initial use. starting and stopping the pressure washer See Figure 9. caution: Do not run the pump without the water supply connected and turned on. Connect the garden hose. Turn the garden hose on then squeeze the trigger to relieve air pressure. Once a steady stream of water appears, release the trigger. After ensuring the On/Off switch is in the OFF ( O ) position, connect the pressure washer to the power supply. Press the reset button on the pressure washer's plug to make sure the unit is ready for operation. Turn ON ( I ) on the switch to start the motor. To stop the motor, release the trigger and turn OFF ( O ) on the switch. NOTE: The pressure washer may be on and the sytem may have pressure even when the pump and/or motor cannot be heard running. Always use caution around the pressure washer. WARNING: Hold the trigger handle securely with both hands. Expect the trigger handle to move when the trigger is pulled due to reaction forces. Failure to do so could cause loss of control and injury to yourself and others. using the trigger and lock-out See Figure 10. For greater control and safety, keep both hands on the trigger handle at all times. Pull back and hold the trigger to operate the pressure wash- er. Release the trigger to stop the flow of water through the noz- zle. To engage the lock-out: Push the lock-out button to the left on the trigger until it snaps into place. To disengage the lock-out: Push the button to the right on the trigger. For the most effective cleaning, the nozzle end of the spray wand should be between 8 in. and 24 in. from the surface to be cleaned. If the spray is too close it can damage the cleaning surface. 9
-
 1
1 -
2
-
3
-
 4
4 -
 5
5 -
 6
6 -
 7
7 -
 8
8 -
 9
9 -
 10
10 -
 11
11
 |
 |
