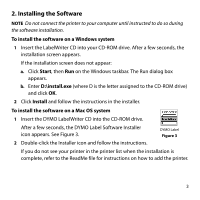
Dymo 69100 Quick Start Guide - Page 3
Unpacking your LabelWriter Printer, English - label printer
 |
View all Dymo 69100 manuals
Add to My Manuals
Save this manual to your list of manuals |
Page 3 highlights
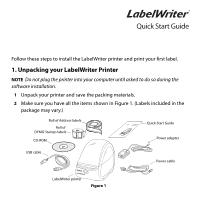
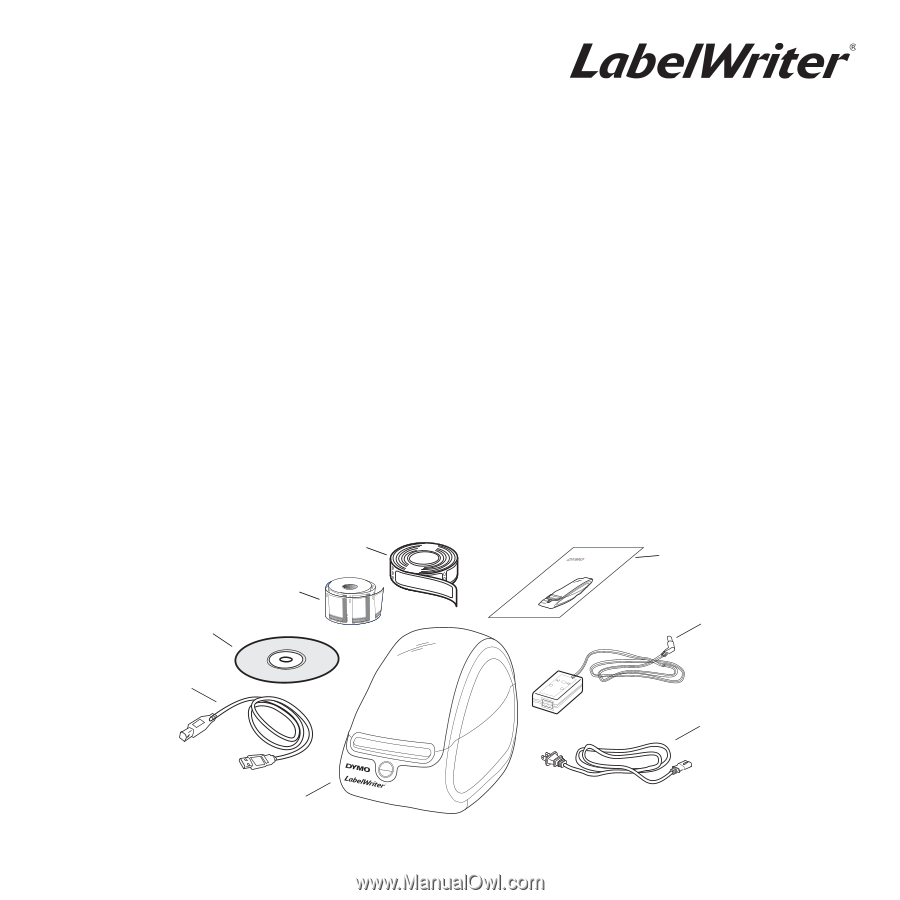
English Quick Start Guide Follow these steps to install the LabelWriter printer and print your first label. 1. Unpacking your LabelWriter Printer NOTE Do not plug the printer into your computer until asked to do so during the software installation. 1 Unpack your printer and save the packing materials. 2 Make sure you have all the items shown in Figure 1. (Labels included in the package may vary.) Roll of Address labels Roll of DYMO Stamps labels CD-ROM LabelWriter Quick Start Quick Start Guide Power adapter USB cable Power cable LabelWriter printer Figure 1
-
 1
1 -
 2
2 -
 3
3 -
 4
4 -
 5
5 -
 6
6 -
 7
7 -
 8
8 -
 9
9 -
10
-
11
-
12
-
13
-
14
 |
 |
English
Quick Start Guide
Follow
t
h
e
s
e
s
te
ps
t
o
i
ns
ta
ll
t
h
e
L
a
b
e
lW
riter
p
ri
n
ter
a
n
d
p
ri
n
t
yo
ur
f
ir
s
t
l
a
b
e
l.
1. Unpacking your LabelWriter Printer
NOTE
Do not plug the printer into your computer until asked to do so during the
software installation.
1
Unp
ack
yo
ur
p
ri
n
ter
a
n
d
s
a
v
e
t
h
e
p
acki
ng m
ateria
ls.
2
M
ake
s
ure
yo
u
h
a
v
e
a
ll
t
h
e
ite
ms shown
i
n F
i
g
ure
1. (L
a
b
e
ls
i
n
c
l
uded
i
n
t
h
e
p
acka
g
e
m
a
y v
ar
y.)
LabelWriter
Quick Start
Figure 1
Pow
er
ada
p
ter
L
a
b
e
lW
riter
p
ri
n
ter
CD-ROM
Roll of A
ddre
ss l
a
b
e
ls
Pow
er
ca
bl
e
Quick
Start
Guide
U
S
B
ca
bl
e
Roll of
DYMO
Sta
mps l
a
b
e
ls