Dymo LabelManager® 280 User Guide 1 - Page 15
Troubleshooting
 |
View all Dymo LabelManager® 280 manuals
Add to My Manuals
Save this manual to your list of manuals |
Page 15 highlights
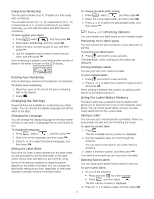
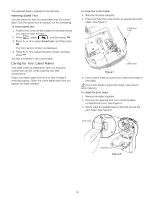
Troubleshooting Review the following possible solutions if you encounter a problem while using your label maker. Problem/Error Message No display Solution Ensure the label maker is turned on. Poor Print Quality Attach the charging adapter to the label maker to recharge the battery pack. See Recharging the Battery Pack. Attach the charging adapter to the label maker to recharge the battery pack. See Recharging the Battery Pack. Clean the print head. See Caring for Your Label Maker. Ensure the label cassette is installed properly. Replace the label cassette. Auto-numbering already inserted Auto-numbering already appears on the label and cannot be added more than once to the same label. Battery failure! Ensure the battery pack is inserted correctly. See Inserting the Battery Pack. Battery pack not inserted properly or damaged. Replace the battery pack. Wait n minutes Allow the battery pack to recharge before unplugging the label maker. See Battery is charging Recharging the Battery Pack. Too Many Characters! Delete some or all of the buffer text. Exceeded maximum number of characters in the Decrease the text size. buffer. Delete lines to fit on the label width. Insert a wider label cassette. No label found. Insert label cartridge No cartridge is present. Label Jam Remove cartridge Motor is stalled due to label jam. Printing... Open the cartridge compartment and insert a label cartridge. See Inserting the Label Cassette. Open the label cartridge compartment and remove the cartridge. Remove jammed label, clearing the jam. Clean the cutter blade. See Caring for Your Label Maker. Make sure the label passes smoothly through the label guides on the label cartridge and that the label and ribbon are taut across the mouth of the cartridge. See Inserting the Label Cassette. No action required. Message disappears when printing is finished. Label length exceeds fixed length Print label with variable length? Press to print a variable length label. Delete some or all of the buffer text. Decrease the text size. Delete lines to fit on the label width. Insert a wider label cassette. Too many lines for the selected label width Delete some or all of the buffer text. Decrease the text size. Delete lines to fit on the label width. Insert a wider label cassette. Change to a variable length label. Label length exceeds fixed length Delete some text. Print the label using variable length. Charge Battery! Attach the charging adapter to the label maker to recharge the battery pack. See Recharging the Battery Pack. Ensure the battery pack is inserted correctly. See Inserting the Battery Pack. Replace the battery pack. How do I remove the backing from the label? DYMO labels have an easy-to-peel split back. 1 Locate the split on the label backing. Split label 2 Gently pinch the label lengthwise, folding toward the printed side of the label. The label backing will separate. 3 Carefully peel away the backing from the label. If you need further assistance, visit the DYMO Web site at www.dymo.com. 15
-
 1
1 -
2
-
3
-
4
-
5
-
6
-
7
-
8
-
9
-
 10
10 -
 11
11 -
 12
12 -
 13
13 -
 14
14 -
 15
15 -
 16
16 -
 17
17
 |
 |