Dynex DX-7P2H User Guide - Page 6
Installing the USB hub
 |
View all Dynex DX-7P2H manuals
Add to My Manuals
Save this manual to your list of manuals |
Page 6 highlights
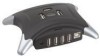
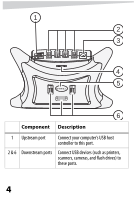
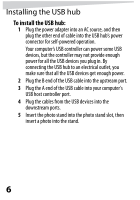
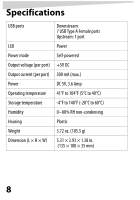
Installing the USB hub To install the USB hub: 1 Plug the power adapter into an AC source, and then plug the other end of cable into the USB hub's power connector for self-powered operation. Your computer's USB controller can power some USB devices, but the controller may not provide enough power for all the USB devices you plug in. By connecting the USB hub to an electrical outlet, you make sure that all the USB devices get enough power. 2 Plug the B end of the USB cable into the upstream port. 3 Plug the A end of the USB cable into your computer's USB host controller port. 4 Plug the cables from the USB devices into the downstream ports. 5 Insert the photo stand into the photo stand slot, then insert a photo into the stand. 6
-
 1
1 -
 2
2 -
 3
3 -
 4
4 -
 5
5 -
 6
6 -
 7
7 -
 8
8 -
 9
9 -
 10
10 -
 11
11 -
 12
12 -
13
-
14
-
15
-
16
-
17
-
18
-
19
-
20
-
21
-
22
-
23
-
24
-
25
-
26
-
27
-
28
-
29
-
30
-
31
-
32
 |
 |

6
Installing the USB hub
To install the USB hub:
1
Plug the power adapter into an AC source, and then
plug the other end of cable into the USB hub’s power
connector for self-powered operation.
Your computer’s USB controller can power some USB
devices, but the controller may not provide enough
power for all the USB devices you plug in. By
connecting the USB hub to an electrical outlet, you
make sure that all the USB devices get enough power.
2
Plug the B end of the USB cable into the upstream port.
3
Plug the A end of the USB cable into your computer's
USB host controller port.
4
Plug the cables from the USB devices into the
downstream ports.
5
Insert the photo stand into the photo stand slot, then
insert a photo into the stand.