EVGA 8400GS User Guide - Page 6
Setting up Multiple Displays - physx
 |
UPC - 843368008703
View all EVGA 8400GS manuals
Add to My Manuals
Save this manual to your list of manuals |
Page 6 highlights
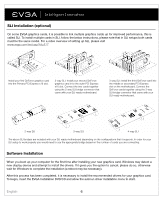
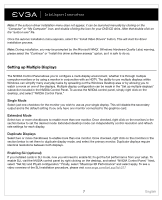
Note: If the autorun driver installation menu does not appear, it can be launched manually by clicking on the "Computer" or "My Computer" icon, and double clicking the icon for your DVD/CD drive. After that double click on the "autorun.exe" file. Once the autorun installation menu appears, select the "Install Video Drivers" button. This will start the driver installation process. Note: During installation, you may be prompted by the Microsoft WHQL (Windows Hardware Quality Labs) warning, please select the "Continue" or "Install this driver software anyway" option, as it is safe to do so. Setting up Multiple Displays The NVIDIA Control Panel allows you to configure a multi-display environment, whether it is through multiple computer monitors or by using a monitor in conjunction with an HDTV. The ability to use multiple displays within Windows can simplify many everyday tasks by spreading out the Windows Desktop area or by allowing you to watch a movie on one of the displays. Multiple display configuration can be made in the "Set up multiple displays" subsection located in the NVIDIA Control Panel. To access the NVIDIA control panel, simply right click on the desktop, and select "NVIDIA Control Panel." Single Mode Select just one checkbox for the monitor you wish to use as your single display. This will disable the secondary output and is the default setting if you only have one monitor connected to the graphics card. Extended Mode Select two or more checkboxes to enable more than one monitor. Once checked, right click on the monitors in the section below to set the desired mode. Extended desktop mode can independently control resolution and refresh rate settings for each display. Duplicate Displays Select two or more checkboxes to enable more than one monitor. Once checked, right click on the monitors in the section below to set them to duplicate display mode, and select the primary monitor. Duplicate displays require identical resolutions between both displays. Enabling SLI (optional) If you installed cards in SLI mode, now you will need to enable SLI to get the full performance from your setup. To enable SLI, visit the NVIDIA control panel by right clicking on the desktop, and select "NVIDIA Control Panel." Next, select "Set SLI and PhysX configuration." Finally, select "Maximize 3D Performance" and select apply. To see a video overview of the SLI installation procedure, please visit www.evga.com/twit.asp?id=517 7 English
-
 1
1 -
 2
2 -
 3
3 -
 4
4 -
 5
5 -
 6
6 -
 7
7 -
 8
8 -
 9
9
 |
 |
