EVGA Classified SR-X User Guide - Page 8
EVGA Classified SR-X, Motherboard Layout
 |
View all EVGA Classified SR-X manuals
Add to My Manuals
Save this manual to your list of manuals |
Page 8 highlights
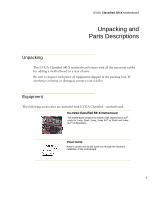
EVGA Classified SR-X Motherboard Figure 1. EVGA Classified SR-X Motherboard Layout 4 2 26 1 16 7 25 23 22 7 15 24 21 1. Primary CPU socket 2. Secondary CPU socket 3. 1394B header 4. CPU Fan headers 5. Intel® C606 Chipset 6. 24-pin ATX power connector 7. Fan headers 8. PCI-E/DIMM disable switches 9. Mini-SAS connectors 4 22 23 7 3 20 5 14 10. Serial-ATA (SATA) connectors 11. USB 3.0 header 12. Front panel connector 13. Debug LED Display 14. USB headers 15. 6 Pin power for PCI-E slots 16. EZ voltage read points 17. CMOS clear button 18. Power button 7 6 10 13 8 9 11 12 7 19 18 17 19. Reset button 20. PC Speaker 21. PCI-E 3.0 slots 22. 8-pin ATX_12V power connector 23. 6 Pin CPU power (optional) 24. Front panel Audio connector 25. Back panel connectors (Figure 2) 26. CPU1 disable switch 8
-
 1
1 -
2
-
 3
3 -
 4
4 -
 5
5 -
 6
6 -
 7
7 -
 8
8 -
 9
9 -
 10
10 -
 11
11 -
 12
12 -
 13
13 -
14
-
15
-
16
-
17
-
18
-
19
-
20
-
21
-
22
-
23
-
24
-
25
-
26
-
27
-
28
-
29
-
30
-
31
-
32
-
33
-
34
-
35
-
36
-
37
 |
 |
