Electrolux E15IM60GPS Complete Owner's Guide (English) - Page 10
Door Reversal
 |
View all Electrolux E15IM60GPS manuals
Add to My Manuals
Save this manual to your list of manuals |
Page 10 highlights
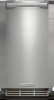
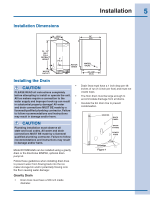
10 Door Reversal Reversing the Door (some models) All Electrolux units may be left or right hand opening. The door opening is easily reversed by moving the hinge hardware to the opposite side (see Figure 12). 2 Remove plastic screw plugs (3 top and 3 bottom) from new hinge location (see Figure 14), and remove hinge pin hole plug in top of door (see Figure 15). Do not discard. SCREW PLUGS Figure 12 To reverse the door: 1 Remove top hinge screw pin from cabinet using a Phillips® head screwdriver (see Figure 13). Remove door by tilting forward and lifting off bottom hinge pin. Figure 13 Figure 14 Hole Plug UL308 Figure 15 3 Remove top hinge (3 screws), reinstall hinge screw pin, and remount on opposite side BOTTOM (see Figure 16). HINGE SCREW PIN Figure 16 UL313
-
 1
1 -
2
-
3
-
4
-
 5
5 -
 6
6 -
 7
7 -
 8
8 -
 9
9 -
 10
10 -
 11
11 -
 12
12 -
 13
13 -
 14
14 -
 15
15 -
16
-
17
-
18
-
19
-
20
-
21
-
22
 |
 |
