Electrolux E30EW75ESS Use and Care Manual - Page 26
To Start The Delayed Self-clean Cycle - review
 |
View all Electrolux E30EW75ESS manuals
Add to My Manuals
Save this manual to your list of manuals |
Page 26 highlights
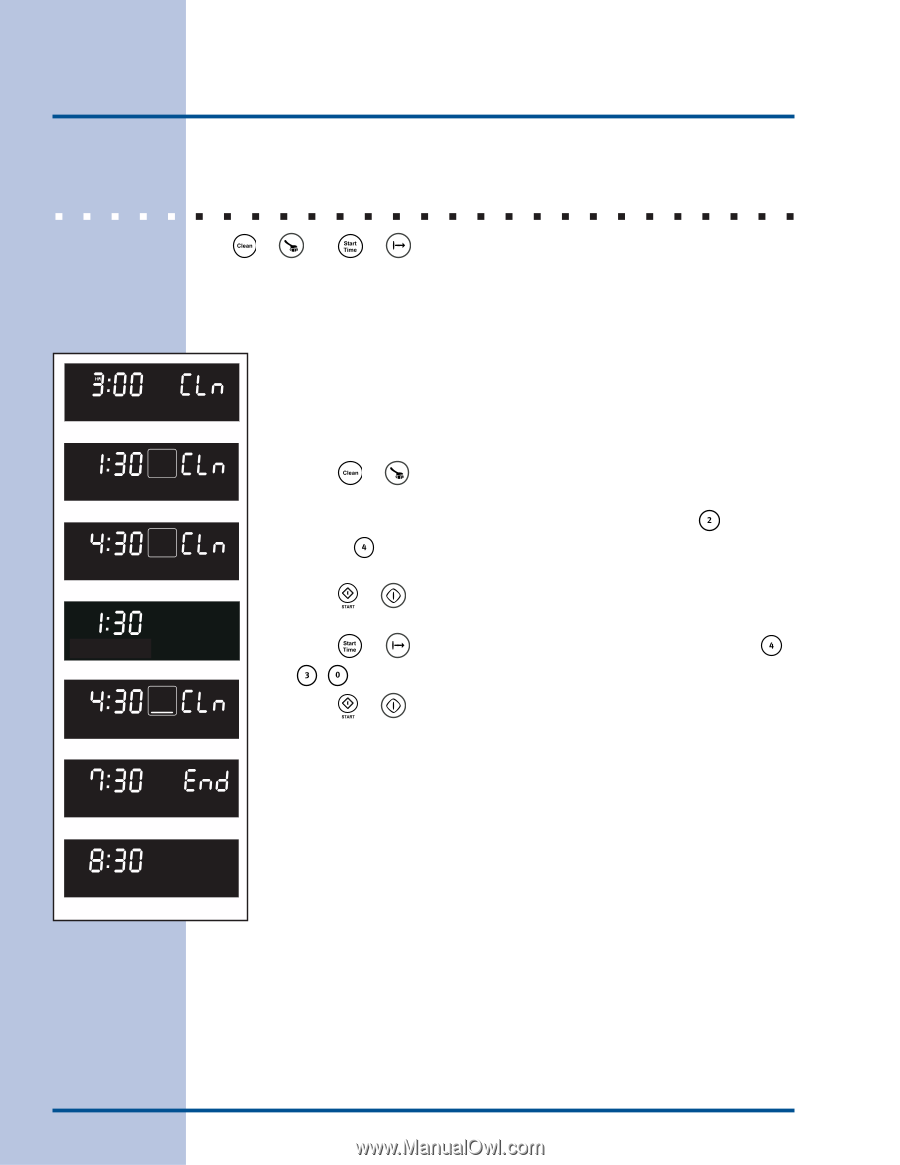
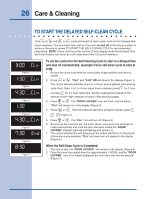
26 Care & Cleaning TO START THE DELAYED SELF-CLEAN CYCLE The or and or pads and length of clean cycle, controls the Delayed Self- Clean operation. The automatic timer will turn the oven on and off at the time you select in advance. Be sure to review TO START THE SELF-CLEAN CYCLE for recommended clean times. NOTE: If your clock is set for normal 12 hour display mode the Delayed Time Sel-Clean feature can never be set to start more than 12 hours in advance. Figure 1 Figure 2 Figure 3 Figure 4 Figure 5 Figure 6 Figure 7 To set the control for the Self-Cleaning Cycle to start at a delayed time and shut off automatically: (example 3 hour self-clean cycle to start at 4:30): 1. Be sure the clock is set with the correct time of day and the oven door is closed. 2. Press or . "CLn" and "3:00" HR will show in the display (Figure 1). The control will automatically clean for a 3 hour period (default self-cleaning cycle time). Note: If a 2 or 4 hour clean time is desired, press for 2 hour or press for a 4 hour clean time. Set the cleaning time based on the amount of soil-light, medium or heavy (*See previous page). 3. Press or . The "DOOR LOCKED" icon will flash; and the letters "CLn" will remain on in the display (Figure 2). 4. Press or . Enter the desired start time using the number pads , , (Figure 3). 5. Press or . The "CLn" icon will turn off (Figure 4). 6. As soon as the control is set, the motor driven oven door lock will begin to close automatically and once the door has been locked the "DOOR LOCKED" indicator light will quit flashing and remain on. 7. The control will start the self-cleaning at the setted start time, for the period of time previously selected. "CLn" and oven icon will appear in the display (Figure 5). When the Self-Clean Cycle is Completed: 1. The time of day, the "DOOR LOCKED" will remain in the display (Figure 6). 2. Once the oven has cooled down for approximately 1 HOUR, and the "DOOR LOCKED" icon is no longer displayed, the oven door can then be opened (Figure 7).
-
 1
1 -
2
-
3
-
4
-
5
-
6
-
7
-
8
-
9
-
10
-
11
-
12
-
13
-
14
-
15
-
16
-
17
-
18
-
19
-
20
-
 21
21 -
 22
22 -
 23
23 -
 24
24 -
 25
25 -
 26
26 -
 27
27 -
 28
28 -
 29
29 -
 30
30 -
 31
31 -
32
-
33
-
34
-
35
-
36
 |
 |