Electrolux E36GF76HPS Installation Instructions - Page 3
Electrical Requirements - range
 |
View all Electrolux E36GF76HPS manuals
Add to My Manuals
Save this manual to your list of manuals |
Page 3 highlights
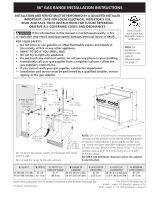
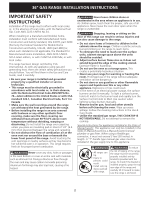
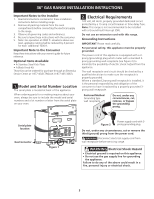
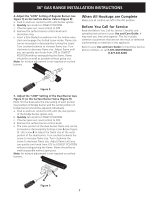
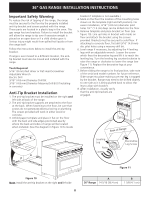
36" GAS RANGE INSTALLATION INSTRUCTIONS Important Notes to the Installer 1. Read all instructions contained in these installation instructions before installing range. 2. Remove all packing material from the oven compartments before connecting the electrical supply to the range. 3. Observe all governing codes and ordinances. 4. Be sure to leave these instructions with the consumer. 5. Note: For operation at 2000 ft. elevations above see level, appliance rating shall be reduced by 4 percent for each additional 1000 ft. Important Note to the Consumer Keep these instructions with your owner's guide for future reference. Optional Items Available: • A Stainless Steel Kick Plate • A Black Knob Kit Those kits can be ordered for purchase through an Electrolux Service Center at 1-877-4ELECTROLUX (1-877-435-3287). 1. Model and Serial Number Location The serial plate is located at back of the appliance. When ordering parts for or making inquires about your oven, always be sure to include the model and serial numbers and a lot number or letter from the serial plate on your oven. 2. Electrical Requirements 120 volt, 60 Hertz, properly grounded dedicated circuit protected by a 15 amp circuit breaker or time delay fuse. Note: This range is not recommended to be installed with a Ground Fault Interrupt (GFI). Do not use an extension cord with this range. Grounding Instructions IMPORTANT Please read carefully. For personal safety, this appliance must be properly grounded. The power cord of this appliance is equipped with a 3prong (grounding) plug which mates with a standard 3prong grounding wall receptacle (see Figure 2) to minimize the possibility of electric shock hazard from the appliance. The wall receptacle and circuit should be checked by a qualified electrician to make sure the receptacle is properly grounded. Where a standard 2-prong wall receptacle is installed, it is the personal responsibility and obligation of the consumer to have it replaced by a properly grounded 3prong wall receptacle. Preferred Method Grounding type wall receptacle Do not, under any circumstances, cut, remove, or bypass the grounding prong. Serial plate location Gas Connector Figure 1 Figure 2 Power supply cord with 3prong grounding plug. Do not, under any circumstances, cut or remove the third (ground) prong from the power cord. Disconnect electrical supply cord from wall receptacle before servicing range. Electrical Shock Hazard • Electrical ground is required on this appliance. • Do not use the gas supply line for grounding the appliance. Failure to do any of the above could result in a fire, personal injury or electrical shock. 3
-
 1
1 -
 2
2 -
 3
3 -
 4
4 -
 5
5 -
 6
6 -
 7
7 -
 8
8 -
 9
9 -
10
-
11
-
12
-
13
-
14
-
15
-
16
-
17
-
18
-
19
-
20
 |
 |