Electrolux ECVI4262AS Complete Owners Guide English - Page 10
English
 |
View all Electrolux ECVI4262AS manuals
Add to My Manuals
Save this manual to your list of manuals |
Page 10 highlights
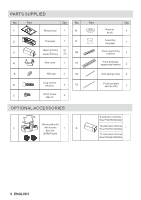
Fig. 7 Fig. 9 Step 4 Mount the truss part (2) onto the ceiling with 4 sets of long screws (6) and washers (8) (fig. 8 ). Make sure the power cable for the range hood is routed inside the bracket. Fig. 8 IMPORTANT Before mounting the truss part onto the ceiling, please remove the supporting plate firstly (fig. 9 ). Remember to keep these screws which will be reused in step 8 Step 5 Depending on the ceiling height ensure required power cable length. See the table (fig.10 ) below for reference. 8 feet 3 feet 5 7 9 Fig. 10 10 ENGLISH
-
 1
1 -
2
-
3
-
4
-
 5
5 -
 6
6 -
 7
7 -
 8
8 -
 9
9 -
 10
10 -
 11
11 -
 12
12 -
 13
13 -
 14
14 -
 15
15 -
16
-
17
-
18
-
19
 |
 |

Step 4
Mount the truss part (2) onto the ceiling
with 4 sets of long screws (6) and washers
(8) (fig.
).
Make sure the power cable for the range
hood is routed inside the bracket.
8
Step 5
Depending on the ceiling height ensure
required power cable length. See the
table (fig.
) below for reference.
Fig.
10
IMPORTANT
Before mounting the truss part onto the
ceiling, please remove the supporting
plate firstly (fig.
). Remember to keep
these screws which will be reused in
step 8
Fig.
Fig.
5
7
9
8 feet
3 feet
Fig.
7
8
9
9
10
10
ENGLISH