Electrolux EW30EF65GS Complete Owner's Guide (English) - Page 24
Broiling in upper oven, Setting broil
 |
UPC - 012505544514
View all Electrolux EW30EF65GS manuals
Add to My Manuals
Save this manual to your list of manuals |
Page 24 highlights
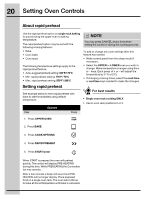
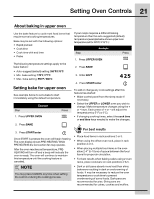
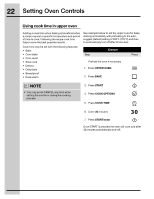
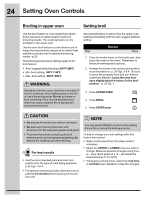
24 Setting Oven Controls Broiling in upper oven Setting broil Use the broil feature to cook meats that require direct exposure to radiant heat for optimum browning results. This cooking feature is only available in the upper oven. Use the conv broil feature to cook thicker cuts of meats that require direct exposure to radiant heat and the convection fan for optimum browning results -p.32- The following temperature settings apply to the broil feature: • Auto-suggest (default) setting: 550°F/288°C • Min. broil setting: 300°F / 148°C • Max. broil setting: 550°F / 288°C See example below to set broil for the upper oven starting immediately with the auto-suggest (default) setting: Step Example Press 1. Place the broiler insert on the broiler pan, then place the meat on the insert. Remember to follow all warnings and cautions. 2. Arrange the interior oven rack to rack position recommendations -p. 25 Figs. 2 & 4-. Be sure to place the prepared food and pan directly under broil element. Leave the oven door open slightly (about 4 inches ) in the broil position. -p. 25 Fig. 1- Should an oven fire occur, close the oven door. If the fire continues, throw baking soda on the fire or use a fire extinguisher. Do not put water or flour on the fire. Flour may be explosive and water can cause a grease fire to spread and cause personal injury. 3. Press UPPER OVEN 4. Press BROIL 5. Press START/enter • Do not use the broiler pan without the insert. • Do not cover the broil pan/insert with aluminum foil; the exposed grease could ignite. • To prevent food from contacting the broil element and to prevent grease splattering, do not use the roasting rack when broiling. For best results • Use the recommended pans and oven rack positions for the type of meat being prepared p.25 Figs. 3 & 4-. • For optimum browning results, allow the oven to preheat 5-6 minutes before placing the food in the oven. NOTE Example You may press CANCEL any time while setting the control or during the broiling process. To add or change any cook settings after this feature has started: • Wake control panel from the sleep mode if necessary. • Select the UPPER or LOWER oven you wish to change. Make temperature changes using the + or - keys. Each press of + or - will adjust the temperature by 5° F ( or 2°C). • If changing cooking times, select the cook time or end time keys needed to make the changes.
-
 1
1 -
2
-
3
-
4
-
5
-
6
-
7
-
8
-
9
-
10
-
11
-
12
-
13
-
14
-
15
-
16
-
17
-
18
-
 19
19 -
 20
20 -
 21
21 -
 22
22 -
 23
23 -
 24
24 -
 25
25 -
 26
26 -
 27
27 -
 28
28 -
 29
29 -
30
-
31
-
32
-
33
-
34
-
35
-
36
-
37
-
38
-
39
-
40
-
41
-
42
-
43
-
44
-
45
-
46
-
47
-
48
-
49
-
50
-
51
-
52
-
53
-
54
-
55
-
56
-
57
-
58
-
59
-
60
-
61
-
62
-
63
-
64
-
65
-
66
-
67
-
68
 |
 |
