Electrolux EW30GS80RS Installation Instructions English Spanish French
Electrolux EW30GS80RS Manual
 |
View all Electrolux EW30GS80RS manuals
Add to My Manuals
Save this manual to your list of manuals |
Electrolux EW30GS80RS manual content summary:
- Electrolux EW30GS80RS | Installation Instructions English Spanish French - Page 1
SERVICE MUST BE PERFORMED BY A QUALIFIED INSTALLER. IMPORTANT: SAVE FOR LOCAL ELECTRICAL INSPECTOR'S USE. READ AND SAVE THESE INSTRUCTIONS FOR FUTURE REFERENCE. United States If the information in this manual the Consumer Keep these instructions with your owner's guide for future reference. - Electrolux EW30GS80RS | Installation Instructions English Spanish French - Page 2
Guide, read it carefully. • Be sure your range is installed and grounded properly by a qualified installer or service power outage, the surface burners can be lit manually. To light a surface burner, hold a spillage. Follow the precleaning instructions in the Use and Care Guide. • Unlike the standard - Electrolux EW30GS80RS | Installation Instructions English Spanish French - Page 3
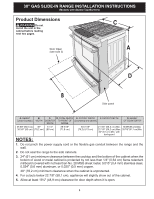
30" GAS SLIDE-IN RANGE INSTALLATION INSTRUCTIONS (Models with Sealed Top Burners) Product Dimensions C Do not install the unit in the cabinet before reading next two pages. Door Open A (see note 5) D B Side - Electrolux EW30GS80RS | Installation Instructions English Spanish French - Page 4
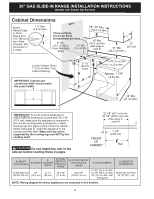
30" GAS SLIDE-IN RANGE INSTALLATION INSTRUCTIONS (Models with Sealed Top Burners) Cabinet Dimensions Shave Raised Edge (see page 5), insert the appliance in the counter and then level. Make sure the unit is supported by the leveling legs and NOT by the cooktop itself. Do not install the unit in the - Electrolux EW30GS80RS | Installation Instructions English Spanish French - Page 5
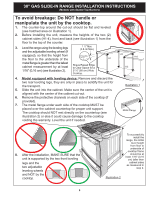
30" GAS SLIDE-IN RANGE INSTALLATION INSTRUCTIONS (Models with Sealed Top Burners) To avoid breakage: flange under each side of the cooktop MUST be placed over the cabinet countertop for proper unit support. The cooktop should NOT rest directly on the countertop (see illustration 2) or else it could - Electrolux EW30GS80RS | Installation Instructions English Spanish French - Page 6
30" GAS SLIDE-IN RANGE INSTALLATION INSTRUCTIONS (Models with Sealed Top Burners) Before Starting Tools you will need For leveling legs and anti-tip brackets: ● Adjustable wrench or channel lock pliers ● 1/4" (7mm) - Electrolux EW30GS80RS | Installation Instructions English Spanish French - Page 7
supply line. If LP/Propane conversion kit has been used, follow instructions provided with the kit for converting the pressure regulator to LP/Propane are not kinked. The supply line must be equipped with an approved manual shutoff valve. This valve should be located in the same room as - Electrolux EW30GS80RS | Installation Instructions English Spanish French - Page 8
GFI). Do not use an extension cord with this range. Grounding Instructions IMPORTANT Please read carefully. For personal safety, this appliance must main power source, and turn off the manual gas shut-off valve. Make sure the range is cold. Remove the service drawer (warmer drawer on some models) - Electrolux EW30GS80RS | Installation Instructions English Spanish French - Page 9
on an open door or if a child climbs upon it. Serious injury might result from spilled hot liquids or from the range itself. Follow the instructions below to install the anti-tip brackets. If range is ever moved to a different location, the antitip brackets must also be moved and installed with - Electrolux EW30GS80RS | Installation Instructions English Spanish French - Page 10
the leveling legs. If range is ever moved to a different location, the antitip bracket must also be moved and installed with the range. Instructions are provided for installation in wood or cement floor. When fastening to floor, be sure that screws do not penetrate electrical wiring, gas line - Electrolux EW30GS80RS | Installation Instructions English Spanish French - Page 11
an added convenience. Refer to the Use and Care Guide for oven door removal instructions. Figure 13 Standard Installation 9.1 The range cooktop If Accessories Needed Installation With Backguard A backguard kit can be ordered through a Service Center. The cutout depth (21¾" (55,2 cm) Min., 221/8" ( - Electrolux EW30GS80RS | Installation Instructions English Spanish French - Page 12
30" GAS SLIDE-IN RANGE INSTALLATION INSTRUCTIONS (Models with Sealed Top Burners) 10. Leveling the Range 10.1 Models Equipped with Leveling Device Level the range after installation in the cutout opening. 1. Open - Electrolux EW30GS80RS | Installation Instructions English Spanish French - Page 13
(Models with Sealed Top Burners) 12. Check Operation Refer to the Use and Care Guide packaged with the range for operating instructions and for care and cleaning of your range. Remove all packaging from the oven before testing. 12.1 Check Burner Cap Placement Regular burner It is - Electrolux EW30GS80RS | Installation Instructions English Spanish French - Page 14
30" GAS SLIDE-IN RANGE INSTALLATION INSTRUCTIONS (Models with Sealed Top Burners) 12.2 Turn on Electrical Power and Open Main Shutoff Gas Valve 12.3 Check the Igniters Operation of electric igniters should - Electrolux EW30GS80RS | Installation Instructions English Spanish French - Page 15
of fuel and the pressure the range was adjusted for when it left the factory. Before You Call for Service Read the Before You Call Checklist and operating instructions in your Use and Care Guide. It may save you time and expense. The list includes common occurrences that are not the result of - Electrolux EW30GS80RS | Installation Instructions English Spanish French - Page 16
PARA REFERENCIA FUTURA. Estados unidos Si la información contenida en este manual no es seguida exactamente, puede ocurrir un incendio o explosión causando daños materiales, lesión personal o la muerte. Canada Consulte la placa de serie para verificar la certificación vigente del organismo - Electrolux EW30GS80RS | Installation Instructions English Spanish French - Page 17
en cualquier otro artefacto que use gas y genere calor, hay ciertas precauciones de seguridad que usted debe seguir. Estas serán encontradas en el Manual del Usuario, léalo cuidadosamente. • Asegúrese de que la estufa sea instalada y conectada a tierra en forma apropiada por un instalador calificado - Electrolux EW30GS80RS | Installation Instructions English Spanish French - Page 18
otro utensilio antes de usar el ciclo de autolimpieza del horno. Limpie todo exceso de derrame de alimentos. Siga las instrucciones de prelimpiado en el Manual del Usuario. • A diferencia de la gama estándar cocinas de gas, ESTA PLANCHA DE COCINA NO ES MOVIBLE. No intente quitar la plancha de cocina - Electrolux EW30GS80RS | Installation Instructions English Spanish French - Page 19
INSTRUCCIONES DE INSTALACIÓN DE COCINAS DE GAS DE 30" (Modelos con quemadores sellados) Dimensiones de la Gabinete Acepille el borde subido a que deje espacio para un borde 31½" (80 cm) min. de anchura de estufa. Vea C en el tablero. 1 ½" Max. (3,8 cm Max.) PARED La superficie debe estar plana y - Electrolux EW30GS80RS | Installation Instructions English Spanish French - Page 20
INSTRUCCIONES DE INSTALACIÓN DE COCINAS DE GAS DE 30" (Modelos con quemadores sellados) Para evitar fractura de la unidad: NO manipule la unidad sosteniendo la cubierta. 1. La cubierta alrededor del espacio donde usted instalara su unidad debe de estar plana y nivelada. (Vea el área sombreada en - Electrolux EW30GS80RS | Installation Instructions English Spanish French - Page 21
INSTRUCCIONES DE INSTALACIÓN DE COCINAS DE GAS DE 30" (Modelos con quemadores sellados) Antes de comenzar Herramientas que va a necesitar Para patas de nivelación y montura anti-vuelco: ● Llave ajustable o alicates ● Llave para apretar tuercas de 1/4" (7mm) ● Llave para apretar tuercas de 3/8" ( - Electrolux EW30GS80RS | Installation Instructions English Spanish French - Page 22
FLUJO DEL GAS Regulador 2. Proporcione un suministro de gas adecuado cierre Unión manual Unión de presión Cuándo se envía de la fábrica, esta línea del suministro se debe de ser equipada de una válvula de cierre manual aprobada. Esta válvula se debe localizar en el mismo cuarto que la estufa - Electrolux EW30GS80RS | Installation Instructions English Spanish French - Page 23
necesario para prevenir fugas de gas en la superficie de la estufa o en la linea de suministro. Desconecte la estufa y su válvula de cierre manual del sistema de tubería del suministro de gas durante cualquier prueba de presión de ese sistema a presiones mayores de 1/2 psig (3,5 kPa o 14" columna de - Electrolux EW30GS80RS | Installation Instructions English Spanish French - Page 24
INSTRUCCIONES DE INSTALACIÓN DE COCINAS DE GAS DE 30" (Modelos con quemadores sellados) 8. Instrucciones de instalación de la fijación anti-inclinación 8.1 Para los modelos equipado con un sistema de dispositivo de nivelación. Para reducir el riesgo de inclinación de la cocina, ésta debe ser - Electrolux EW30GS80RS | Installation Instructions English Spanish French - Page 25
INSTRUCCIONES DE INSTALACIÓN DE COCINAS DE GAS DE 30" (Modelos con quemadores sellados) 8.2 Instrucción para la instalación de las fijaciones de anti-inclinación Para reducir el riesgo de inclinación de la cocina, ésta debe ser asegurada hacia el piso con las fijaciones de anti-inclinación y los - Electrolux EW30GS80RS | Installation Instructions English Spanish French - Page 26
INSTRUCCIONES DE INSTALACIÓN DE COCINAS DE GAS DE 30" (Modelos con quemadores sellados) 9. Instalación de la estufa Nota importante: No es necesario, pero sí es conveniente, quitar la puerta para instalar el horno. Consulte las instrucciones para retirar la puerta en la Guía de Uso y Cuidado. - Electrolux EW30GS80RS | Installation Instructions English Spanish French - Page 27
INSTRUCCIONES DE INSTALACIÓN DE COCINAS DE GAS DE 30" (Modelos con quemadores sellados) 10. Nivelación de la estufa 10.1 Para los modelos equipado con un sistema de dispositivo de nivelación. Nivele la cocina después de haberla instalado en la abertura del mostrador. 1. Abra la gaveta. Las - Electrolux EW30GS80RS | Installation Instructions English Spanish French - Page 28
INSTRUCCIONES DE INSTALACIÓN DE COCINAS DE GAS DE 30" (Modelos con quemadores sellados) 12. Comprobación del funcionamiento Consulte el Manual del Usuario incluido con la estufa para instrucciones de operación y instrucciones para el cuidado y limpieza de su estufa. Quite todo el embalaje de la - Electrolux EW30GS80RS | Installation Instructions English Spanish French - Page 29
INSTRUCCIONES DE INSTALACIÓN DE COCINAS DE GAS DE 30" (Modelos con quemadores sellados) 12.2 Enciende la corriente eléctrica y abre la válvula principal de cierre. 12.3 Verifique el encendido de los quemadores superiores El funcionamiento de los encendedores eléctricos debe verificarse después de - Electrolux EW30GS80RS | Installation Instructions English Spanish French - Page 30
la presión a la cual fue ajustada la estufa en la fábrica. Antes de Llamar al Servicio Lea la sección Evite Llamadas de Servicio en su Manual del Usuario. Esto le podrá ahorrar tiempo y gastos. Esta lista incluye ocurrencias comunes que no son el resultado de defectos de materiales o fabricación de - Electrolux EW30GS80RS | Installation Instructions English Spanish French - Page 31
SERVICE IMPORTANT: CONSERVEZ CES INSTRUCTIONS POUR LES INSPECTEURS LOCAUX. LISEZ CES INSTRUCTIONS ET CONSERVEZ‑LES POUR RÉFÉRENCES ULTÉRIEURES. Etats-Unis Canada à la cuisinière 39 Installation du support anti-bascule 40-41 Installation de la Conservez ces instructions avec le guide de l' - Electrolux EW30GS80RS | Installation Instructions English Spanish French - Page 32
ou produisant de la chaleur. Vous trouverez celles‑ci dans votre Guide d'utilisateur, lisez‑les avec attention. • Assurez‑vous que votre respect de ces instructions peut causer des blessures fatales ou de graves brûlures aux enfants et aux adultes. Pour vérifier si le support anti-renversement - Electrolux EW30GS80RS | Installation Instructions English Spanish French - Page 33
les aliments et les autres ustensiles avant de programmer un cycle autonettoyant. Essuyez tous les renversements excessifs. Suivez les instructions pour le pré‑nettoyage dans le Guide de l'utilisateur. • Comme sur les cuisinières standard à gaz, la table de cuisson de cet appareil n'est pas amovible - Electrolux EW30GS80RS | Installation Instructions English Spanish French - Page 34
INSTRUCTIONS D'INSTALLATION POUR CUISINIÈRE ENCASTRABLE DE 30" À GAZ (Modè nivellement au maximum, insérez l'appareil dans le comptoir et ensuite nivelez-le. Assurez-vous que l'appareil est bien supporté par les pattes de nivellement et non par la surface vitrifiée. 22 7/8" (58,1 cm) min. 23 1/4" - Electrolux EW30GS80RS | Installation Instructions English Spanish French - Page 35
INSTRUCTIONS D'INSTALLATION POUR CUISINIÈRE ENCASTRABLE DE 30" À GAZ (Modèles avec br de chaque côté de la table de cuisson doit reposer sur le comptoir pour que l'appareil soit bien supporté. La table de cuisson NE doit PAS toucher directement comptoir (voir l'illustration 2). Nivelez l'appareil si - Electrolux EW30GS80RS | Installation Instructions English Spanish French - Page 36
INSTRUCTIONS D'INSTALLATION POUR CUISINIÈRE ENCASTRABLE DE 30" À GAZ (Modèles avec brûleurs fermés) Avant de commencer Outils requis Pour les pattes de nivellement et le support anti-bascule: • Clé à molette ou pinces multiprises • Tournevis à douille 1/4" (7mm) • Tournevis à douille 3/8" (10mm) • - Electrolux EW30GS80RS | Installation Instructions English Spanish French - Page 37
(2,5 kpa), la pression d'admission doit être d'au moins 11 po (27,9 kpa). Les tests pour vérifier les fuites de gaz doivent être faits selon les instructions de l'étape 4. La ligne de gaz doit être de ½" (1,3 cm) ou de ¾" (1,9 cm) de diamètre intérieur. 3. Scellez les ouvertures Scellez toutes les - Electrolux EW30GS80RS | Installation Instructions English Spanish French - Page 38
d'installation se trouvant dans l'enveloppe. Un installateur qualifié doit effectuer la conversion conformément aux instructions du fabricant et à tous les codes et règlements applicables. Si ces instructions ne sont pas suivies à la lettre, il pourrait en résulter de sérieuses blessures corporelles - Electrolux EW30GS80RS | Installation Instructions English Spanish French - Page 39
temporisé. N'utilisez pas de cordon de rallonge pour brancher l'appareil. Instructions de mise à la terre IMPORTANT Veuillez lire attentivement. Pour votre propre terre. 7. Déplacement de l'appareil en vue d'en faire le service ou le nettoyage Coupez l'alimentation électrique de l'appareil à la bo - Electrolux EW30GS80RS | Installation Instructions English Spanish French - Page 40
ou si un enfant y grimpe. Les renversements de liquides chauds ou la cuisinière peuvent provoquer de sérieuses blessures. Suivez les instructions ci‑dessous pour installer le support anti‑bascule. Si vous déplacez la cuisinière pour l'installer à un autre endroit, vous devez également déplacer le - Electrolux EW30GS80RS | Installation Instructions English Spanish French - Page 41
INSTRUCTIONS D'INSTALLATION POUR CUISINIÈRE ENCASTRABLE DE 30" À GAZ (Modèles avec brûleurs fermés) 8.2 Modèles possédant des vis de nivellement La cuisinière doit être fixée au plancher pour éviter qu'elle ne bascule, en installant un support anti-bascule à l'aide des vis fournies avec la cuisiniè - Electrolux EW30GS80RS | Installation Instructions English Spanish French - Page 42
support anti- bascule maintenant avant de placer l'appareil à sa position finale. Suivez les instructions sur le gabarit fourni avec le support avec un dosseret Vous pouvez commander un nécessaire de dosseret dans un centre de service. La profondeur du découpage de 21¾" (55,2 cm) Min. et 22 - Electrolux EW30GS80RS | Installation Instructions English Spanish French - Page 43
INSTRUCTIONS D'INSTALLATION POUR CUISINIÈRE ENCASTRABLE DE 30" À GAZ (Modèles avec brûleurs fermés) 10. Mise à niveau de la cuisinière 10.1 Modèles possé - Electrolux EW30GS80RS | Installation Instructions English Spanish French - Page 44
INSTRUCTIONS D'INSTALLATION POUR CUISINIÈRE ENCASTRABLE DE 30" À GAZ (Modèles avec brûleurs fermés) 12. Vérification du Fonctionnement Référez‑vous au Guide de l'utilisateur inclus avec la cuisinière pour les directives de fonctionnement et pour l'entretien et le nettoyage de votre cuisinière. - Electrolux EW30GS80RS | Installation Instructions English Spanish French - Page 45
INSTRUCTIONS D'INSTALLATION POUR CUISINIÈRE ENCASTRABLE DE 30" À GAZ (Modèles avec brûleurs fermés) 12.3 Vérifiez les allumeurs Il faut vérifier le fonctionnement des allumeurs é - Electrolux EW30GS80RS | Installation Instructions English Spanish French - Page 46
pression à laquelle la cuisinière a été réglée au moment de l'expédition. Avant d'appeler le service d'entretien Révisez la liste de vérifications préventives et les instructions d'opération dans votre Guide de l'utilisateur. Vous sauverez probablement du temps et de l'argent. La liste contient les - Electrolux EW30GS80RS | Installation Instructions English Spanish French - Page 47
INSTRUCTIONS D'INSTALLATION POUR CUISINIÈRE ENCASTRABLE DE 30" À GAZ (Modèles avec brûleurs fermés) 47 - Electrolux EW30GS80RS | Installation Instructions English Spanish French - Page 48
NOTES - NOTAS 48
-
 1
1 -
 2
2 -
 3
3 -
 4
4 -
 5
5 -
 6
6 -
 7
7 -
8
-
9
-
10
-
11
-
12
-
13
-
14
-
15
-
16
-
17
-
18
-
19
-
20
-
21
-
22
-
23
-
24
-
25
-
26
-
27
-
28
-
29
-
30
-
31
-
32
-
33
-
34
-
35
-
36
-
37
-
38
-
39
-
40
-
41
-
42
-
43
-
44
-
45
-
46
-
47
-
48
 |
 |
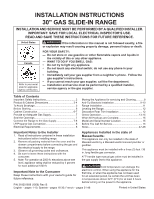
INSTALLATION INSTRUCTIONS
30" GAS SLIDE-IN RANGE
Printed in United States
Important Notes to the Installer
1.
Read all instructions contained in these installation
instructions before installing range.
2.
Remove all packing material from the oven and the
drawer compartments before connecting the gas and
the electrical supply to the range.
3.
Observe all governing codes and ordinances.
4.
Be sure to leave these instructions with the
consumer.
5.
Note: For operation at 2000 ft. elevations above see
level, appliance rating shall be reduced by 4 percent
for each additional 1000 ft.
Important Note to the Consumer
Keep these instructions with your owner's guide for
future reference.
INSTALLATION AND SERVICE MUST BE PERFORMED BY A QUALIFIED INSTALLER.
IMPORTANT: SAVE FOR LOCAL ELECTRICAL INSPECTOR'S USE.
READ AND SAVE THESE INSTRUCTIONS FOR FUTURE REFERENCE.
Table of Contents
Important Safety Instructions
..........................................
2
Product & Cabinet Dimensions
....................................
3-4
To Avoid Breakage
..........................................................
5
Before Starting
................................................................
6
Cabinet Construction
...................................................
6-7
Provide an Adequate Gas Supply
...................................
7
Seal the Openings
..........................................................
7
Connect the Range to the Gas Supply
........................
7-8
LP/Propane Gas Conversion
..........................................
8
Electrical Requirements
..................................................
8
Moving the Appliance for servicing and Cleaning
...........
8
Anti-Tip Brackets Installation
.....................................
9-10
Range Installation
..........................................................
11
Leveling the Range
.......................................................
12
Decorative Rear Trim Installation
.................................
12
Check Operation
......................................................
13-15
When All Hookups are Complete
..................................
15
Model and Serial Number Location
..............................
15
Before You Call for Service
...........................................
15
Notes
.......................................................................
47-48
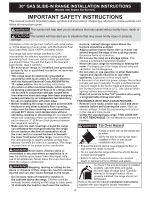
If the information in this manual is not followed exactly, a fire
or explosion may result causing property damage, personal injury or death.
FOR YOUR SAFETY:
— Do not store or use gasoline or other flammable vapors and liquids in
the vicinity of this or any other appliance.
— WHAT TO DO IF YOU SMELL GAS:
•
Do not try to light any appliance.
•
Do not touch any electrical switch; do not use any phone in your
building.
•
Immediately call your gas supplier from a neighbor's phone.
Follow the
gas supplier's instructions.
•
If you cannot reach your gas supplier, call the fire department.
— Installation and service must be performed by a qualified installer,
service agency or the gas supplier.
P/N 318201698 (1508) Rev. B
English – pages 1-15; Spanish - pages 16-30; French – pages 31-46
Appliances Installed in the state of
Massachusetts:
This Appliance can only be installed in the state of
Massachusetts by a Massachusetts licensed plumber or
gasfitter.
This appliance must be installed with a three (3) foot / 36
in. long flexible gas connector.
A"T" handle type manual gas valve must be installed in
the gas supply line to this appliance.
Cold temperature can damage the
electronic control. When using the appliance for the
first time, or when the appliance has not been used
for an extended period, be certain the unit has been
in temperatures above 32°F (0°C) for at least 3 hours
before turning on the power to the appliance.
United States
Canada
Refer to your serial
plate for applicable
agency certification.