Electrolux EW30GS80RS Installation Instructions English Spanish French - Page 12
Leveling the Range, Decorative Rear Trim Installation, some models
 |
View all Electrolux EW30GS80RS manuals
Add to My Manuals
Save this manual to your list of manuals |
Page 12 highlights
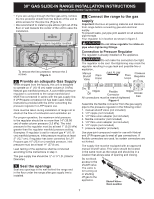
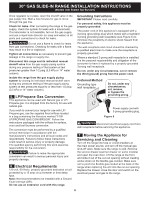
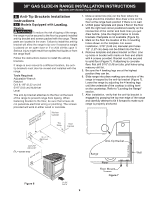
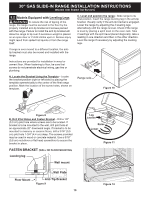
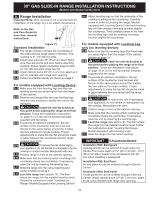
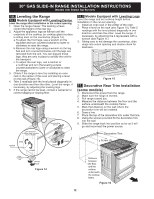
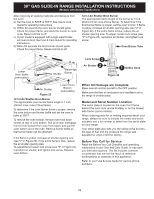
30" GAS SLIDE-IN RANGE INSTALLATION INSTRUCTIONS (Models with Sealed Top Burners) 10. Leveling the Range 10.1 Models Equipped with Leveling Device Level the range after installation in the cutout opening. 1. Open the range drawer. The leveling screws control the height of the rear leg. 2. Adjust the appliance legs as follows until the underside of the cooktop (or cooktop glass) surface is sitting level on the countertop (Figure 14). a.To adjust the front legs, use a wrench on the leg base and turn counterclockwise to lower or clockwise to raise the range. b.Remove the rear legs using a wrench on the leg bas and turn counterclockwise until the legs are removed from the unit. You can discard those legs, they are only in place to solidify the unit for the transport. c. To adjust the rear legs, use a ratchet or a nutdriver and turn the leveling screws counterclockwise to lower or clockwise to raise the range. 3. Check if the range is level by installing an oven rack in the center of the oven and placing a level on the rack (Figure 15). 4. Take 2 readings with the level placed diagonally in one direction and then the other. Level the range, if necessary, by adjusting the leveling legs. 5. If the range cannot be level, contact a carpenter to correct sagging or sloping floor. 10.2 Models Equipped with Leveling Legs Level the range and set cooktop height before installation in the cut-out opening. 1. Install an oven rack in the center of the oven. 2. Place a level on the rack (see Figure 15). Take 2 readings with the level placed diagonally in one direction and then the other. Level the range, if necessary, by adjusting the 4 leg levelers with a wrench (see Figure 11). 3. Taking care to not damage the countertop, slide range into cutout opening and double check for levelness. Figure 15 11. Decorative Rear Trim Installation (some models) 1. Disconnect the power from the range. 2. Make sure the range is leveled. 3. Pull range toward you. 4. Measure the distance between the floor and the surface underneath the cooktop frame. 5. Mark that distance on the wall where the decorative trim will be installed. 6. Draw a line. 7. Place the top of the decorative trim under that line. 8. Using the screws provided fix the decorative trim into the wall. 9. Slide the range back into position as far as it will go and reconnect the power source. Decorative Trim Screw (3) Figure 14 Distance between the floor and the surface underneath the cooktop frame. Figure 16 12
-
 1
1 -
2
-
3
-
4
-
5
-
6
-
 7
7 -
 8
8 -
 9
9 -
 10
10 -
 11
11 -
 12
12 -
 13
13 -
 14
14 -
 15
15 -
 16
16 -
 17
17 -
18
-
19
-
20
-
21
-
22
-
23
-
24
-
25
-
26
-
27
-
28
-
29
-
30
-
31
-
32
-
33
-
34
-
35
-
36
-
37
-
38
-
39
-
40
-
41
-
42
-
43
-
44
-
45
-
46
-
47
-
48
 |
 |
