Electrolux RH36PC60GS Complete Owner's Guide (English) - Page 10
OFF Pushb-utton Switch is switched ON. - installation instructions
 |
UPC - 012505558757
View all Electrolux RH36PC60GS manuals
Add to My Manuals
Save this manual to your list of manuals |
Page 10 highlights
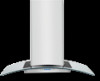
10 Installing the hood 8 assembly screw (B) (A) Place the template in the ceiling considering the instructions for ceiling support structures. Mark with a pencil the hole locations for screws and duct in the ceiling (see also next page) 4 wood screws Fix the upper horizontal support with 4 wood screws. 16 assembly screws Attach the vertical supports (inf) (A) to the hood. Then attach horizontal support (B) (inf) 2 /side 16 assembly screws Attach a second vertical support set to adjust the vertical distance. click ! Attach the assembly to the support fixed on the ceiling Assure with screws (16) Insert the plastic gaskets on each side of the hood. (rear and front) Place the Glass Canopy onto the hood. 2 people are recommended to do this. Place glass brackets using 2 screws by side. All version: Perform the electrical connection. Vent hood ONLY Perform the ductwork connection. Installation with optional recirculation kit. Install the recirculation kit and connect air deflector to transition SEE NEXT PAGES FOR FURTHER DETAIL Attach the vertical duct cover supports using 4 screws. Place each spring using a screw by side. Place upper duct covers sliding through until spring sounds “click”. Then verify Instal the grease filter and turn power on at service panel. Check operation of the hood. IMPORTANT: If the hood doesn't switch ON, before calling for service, check if the internal General ON/ OFF Pushb-utton Switch is switched ON. Frontside of the hood Place lower duct covers using one plastic bracket at each vertex. (4 needed) The lower duct cover shall be secured to rangehood by 4 screws. General ON/OFF Push button Switch Back side of the hood
-
 1
1 -
2
-
3
-
4
-
 5
5 -
 6
6 -
 7
7 -
 8
8 -
 9
9 -
 10
10 -
 11
11 -
 12
12 -
 13
13 -
 14
14 -
 15
15 -
16
-
17
-
18
-
19
 |
 |
